How to Capture the Beauty of Shadow Of The Colossus
If you are a completionist in Virtual Photography, the one capturing all the locations and characters of your most beloved videogames, you’ll probably know that the Shadow Of The Colossus remake by Bluepoint Games is one of the hardest games to photograph in its entirety for a well-known reason: the in-game Photo Mode is so hard to tame that many fellow virtual photographers limited their galleries to a half of the colossi because, quote, “some of them are impossible to photograph with a minimim degree of quality”.
This is true to a certain extension. Some of Fumito Ueda’s pets that are actually almost impossible to capture. A few of them because of the technical limitations of the Photo Mode (Avion in my opinion is the most annoying of them all), some others because of the narrow spaces of the arena (Hello, Kuromori) and some others because they stay under the ground for most of the fight (Dirge, I’m looking at you).
At a certain point of my second photography-focused walkthrough (here you can see the results of my first experience and here an experimental gallery on SOTC environments) I felt the urgence to write this essay and share with the community my tips, tricks and thoughts on how to capture all the 16 Colossi both in 16:9 (horizontal) and 9:16 (vertical) framing. Because yes, I really wanted to double my pain and capture all of them in both ratios.
Before explaining my approach to every single colossus, here a few tips on the Photo Mode options. Most of them are well-known to us VP so I will not explain what filters are used for or how a vignette works, but there are a few hints that can be useful for everyone.
The first hint, a very important one, is that at a certain point you will feel that the only possible way to photograph the largest-sized colossi is to push the FOV (Field Of View) to the highest possible values. You can do it, of course, but only a few colossi in a few selected arenas will not suffer some kind of curvilinear optical distortion. And trust me, there’s no good virtual photography with distortions or aberrations so handle this matter with all of your care. My suggestion is to handle the “distance” factor with the left stick in combination with the Right and Left triggers of the pad before you manage the FOV values. Working with both stick and triggers in harmony should take the camera enough far away from the colossus without causing major distortions or aberrations. Then, and only then, you can manage the FOV. Based on my experience, the golden FOV value for this game is 41.
Another issue that I must tackle here is the exotic management of the DOF (Depth Of Field). The Depth of Field, as you know, is useful to focus on a specific subject at a specific distance from the camera putting out of focus pretty much everything else. This game has a quite deep management of the settings, and this is good, but for the average virtual photographer I’m pretty sure it’s too much to bother with. That’s why I’m going to share with you my personal settings with a photographic sample.

Of course this settings are good in this environment but you have to be smart and adapt them to every single location and colossus, just take this sample as a starting point
And now, let’s talk about the colossi:
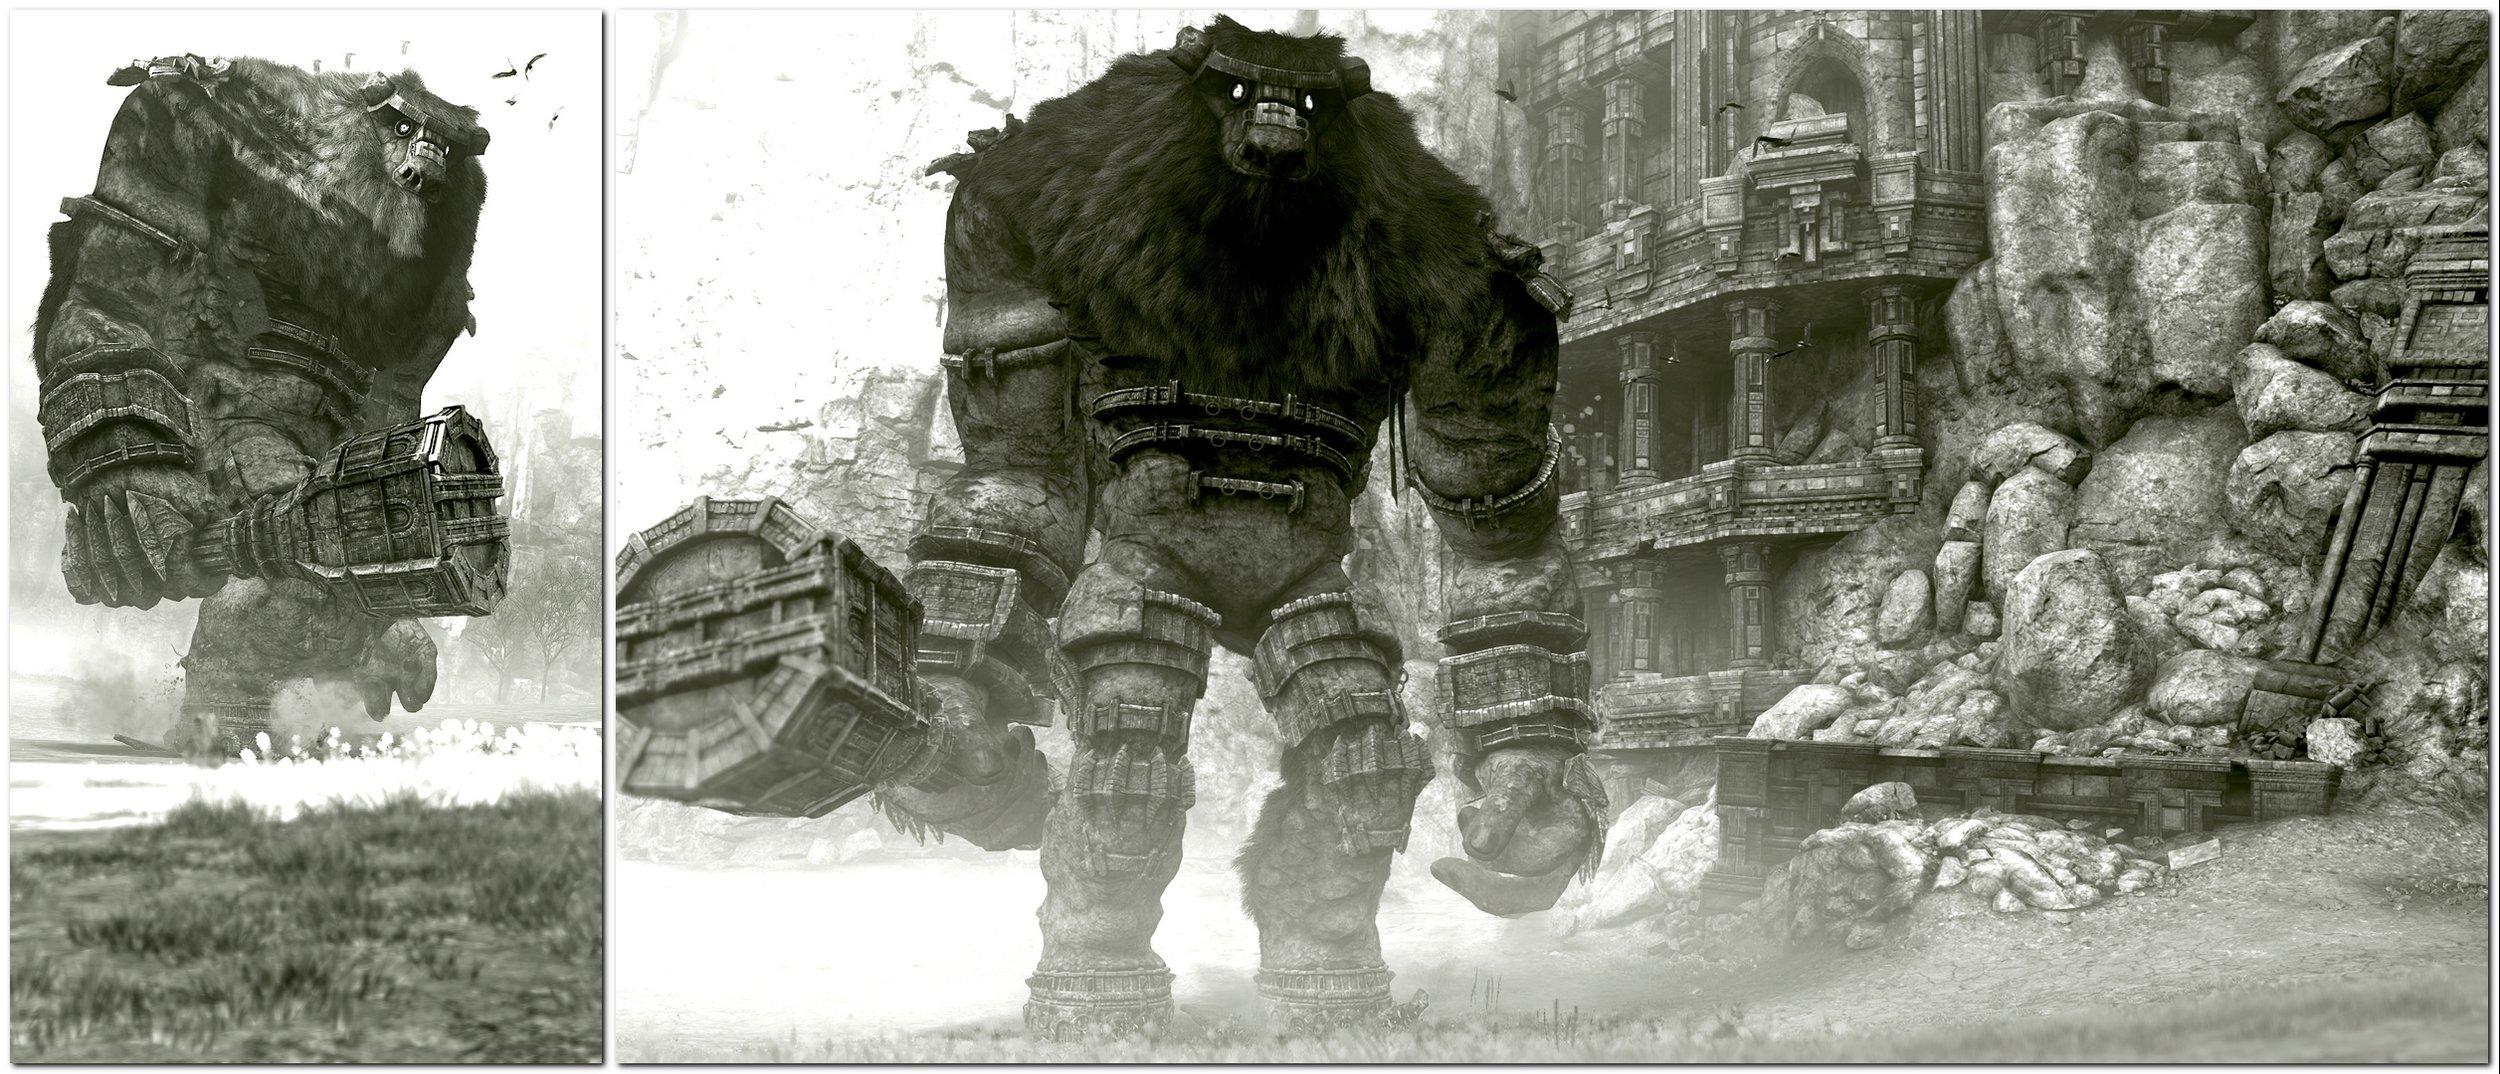
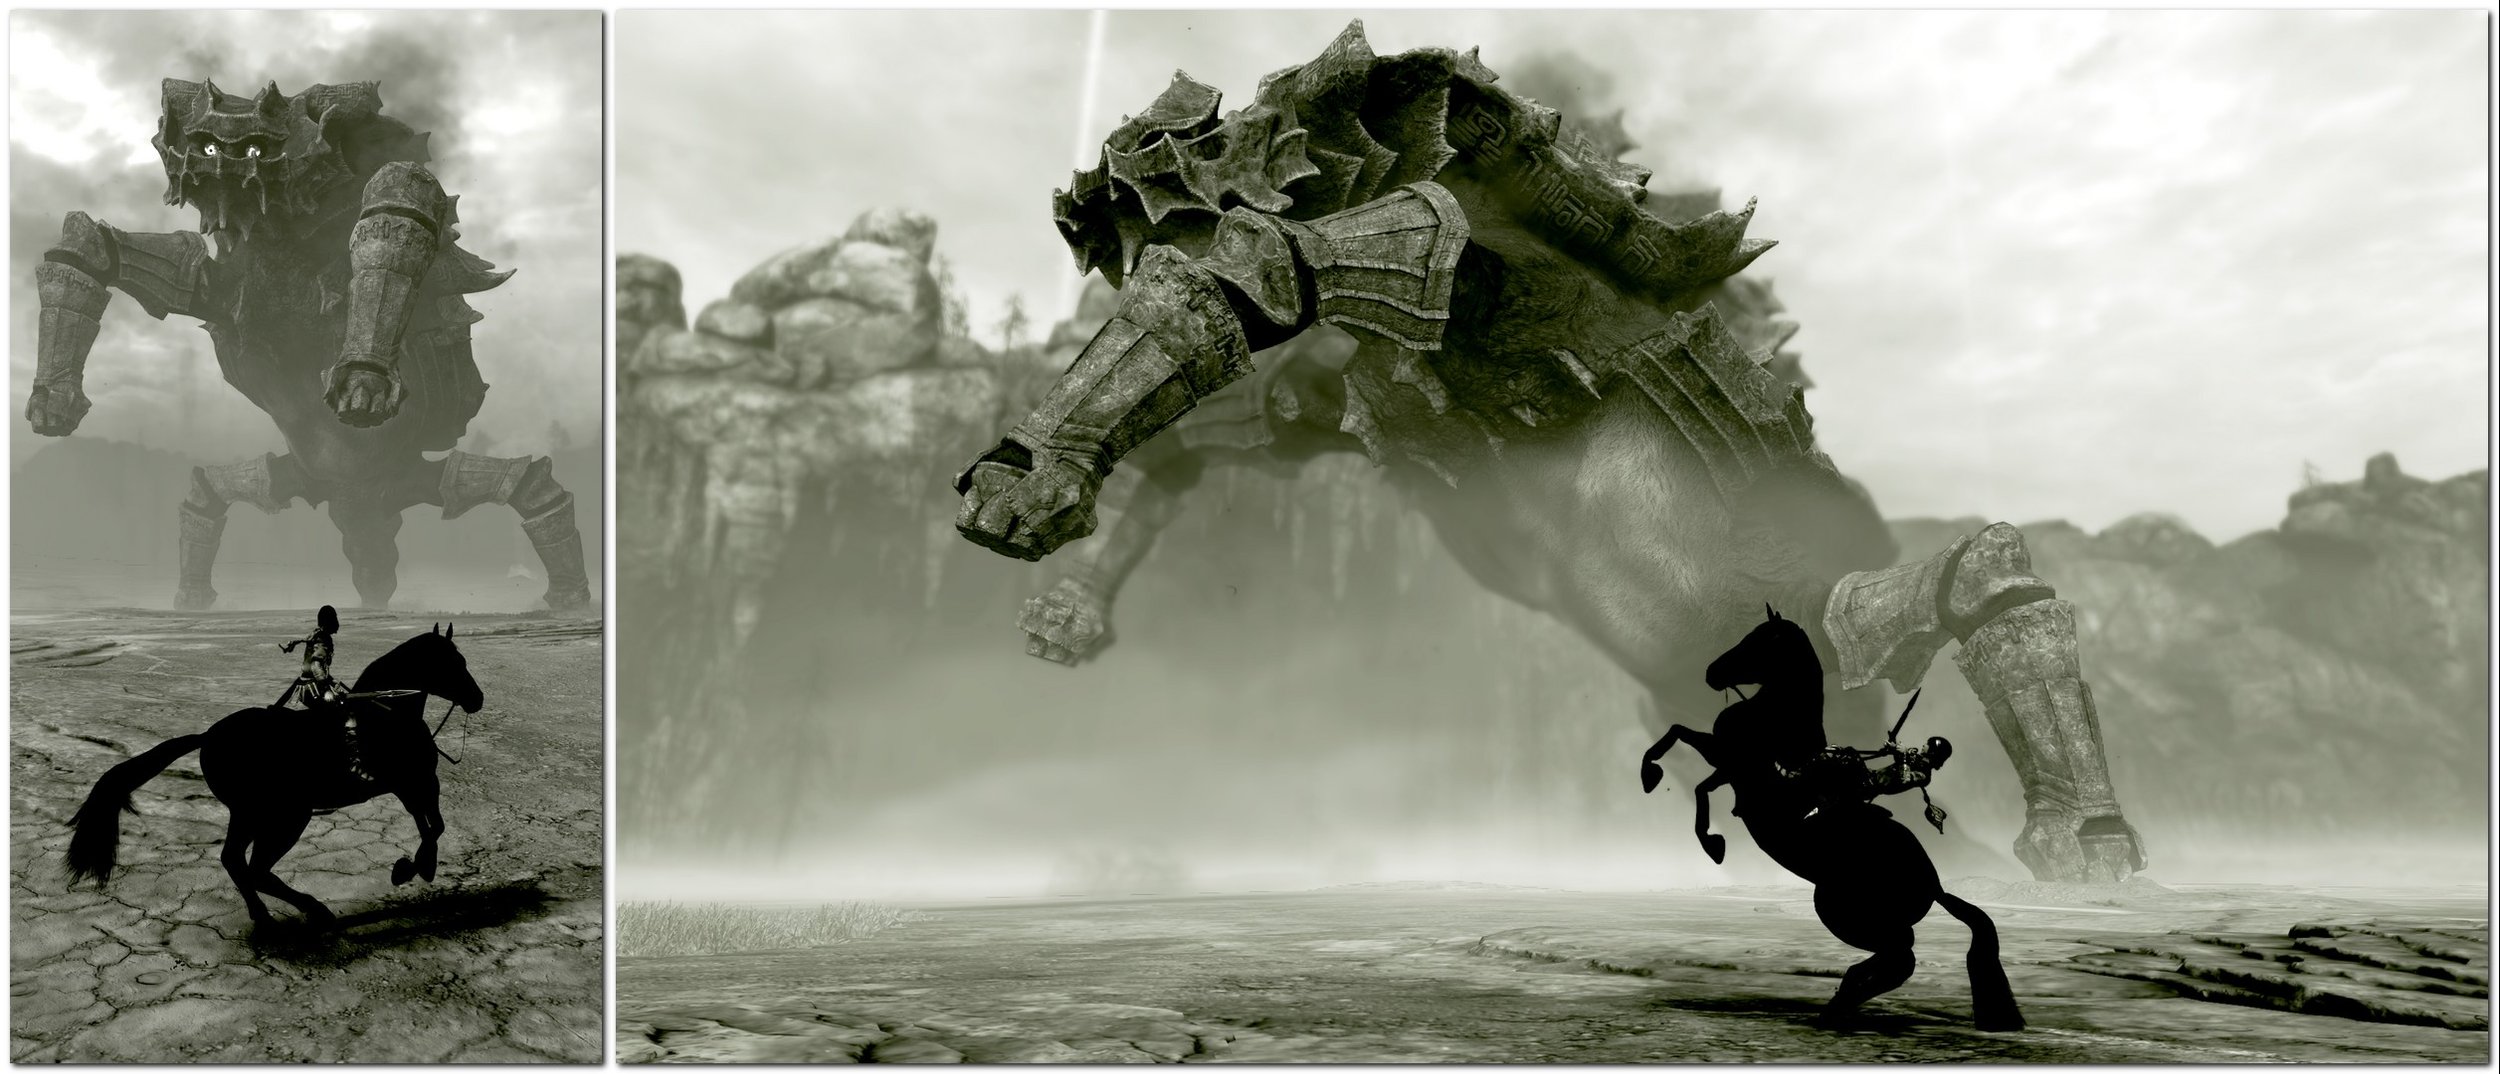
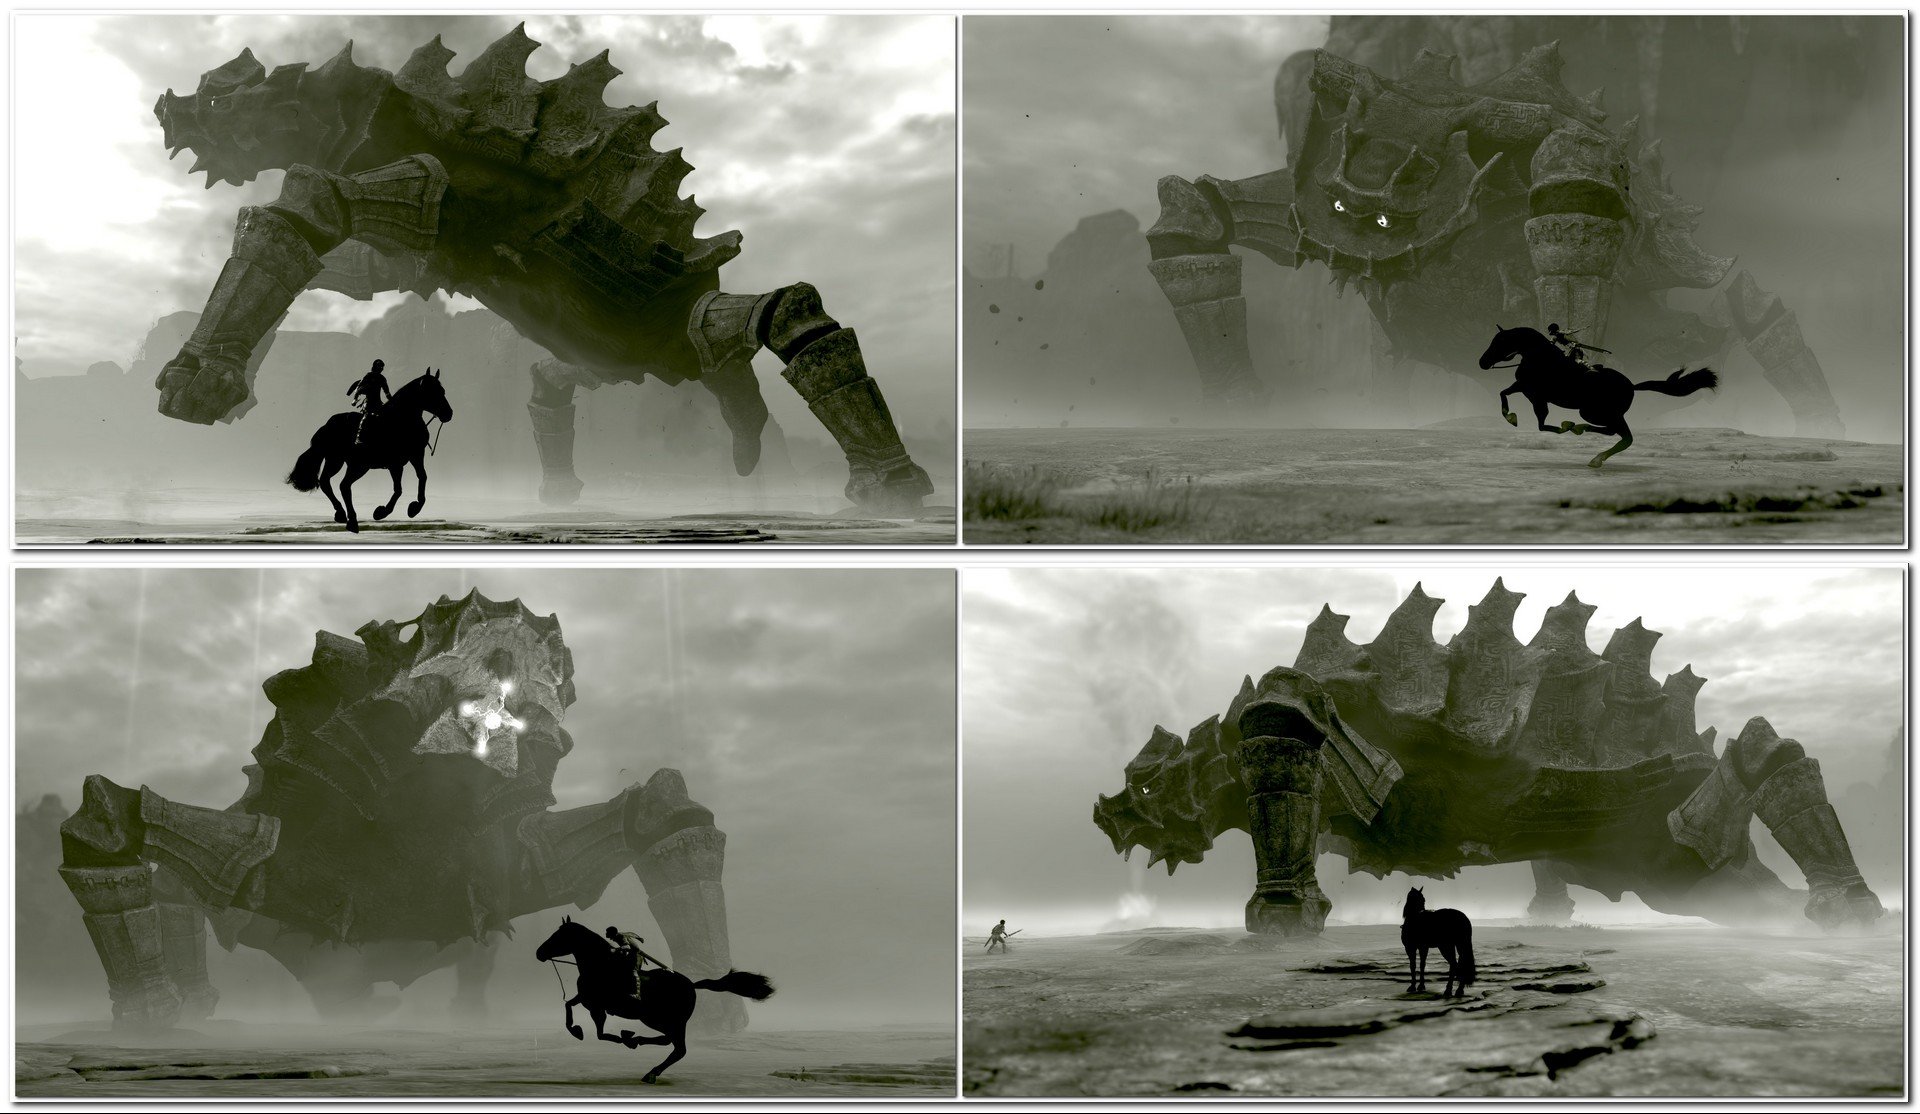
COLOSSUS #1
VALUS - THE MINOTAUR
Valus is by far one of the easiest colossi to portray in both vertical and widescreen framing. The arena is open, with no obstacles to interfere with the camera movements and the light is perfect for taking both color and black & white captures . However, vertical framing will pose some minor problems if you don’t place Wander at the right distance from the colossus. You have to work a lot with the left thumbstick and left trigger to find to find the perfect balance between distance and framing and remember, If you push the FOV beyond the value of 45 you’ll probably have some curvilinear distortion. Widescreen framing on the contrary is a piece of cake: you can work with FOV values between 20 and 40 and still capture the whole minotaur’s figure. My personal suggestion for a fancy widescreen shot is to bring Valus near the temple’s ruins as I did in the picture below to “fill” part of the capture with some interesting stuff (you might want to blur the temple with some depth of field to soften the impact of the structure). In general, widescreen photography and tall colossi might pose a problem of “empty spaces to fill” which, if not correctly managed, will leave your otherwise excellent capture with too much empty and uninteresting parts.
COLOSSUS #2
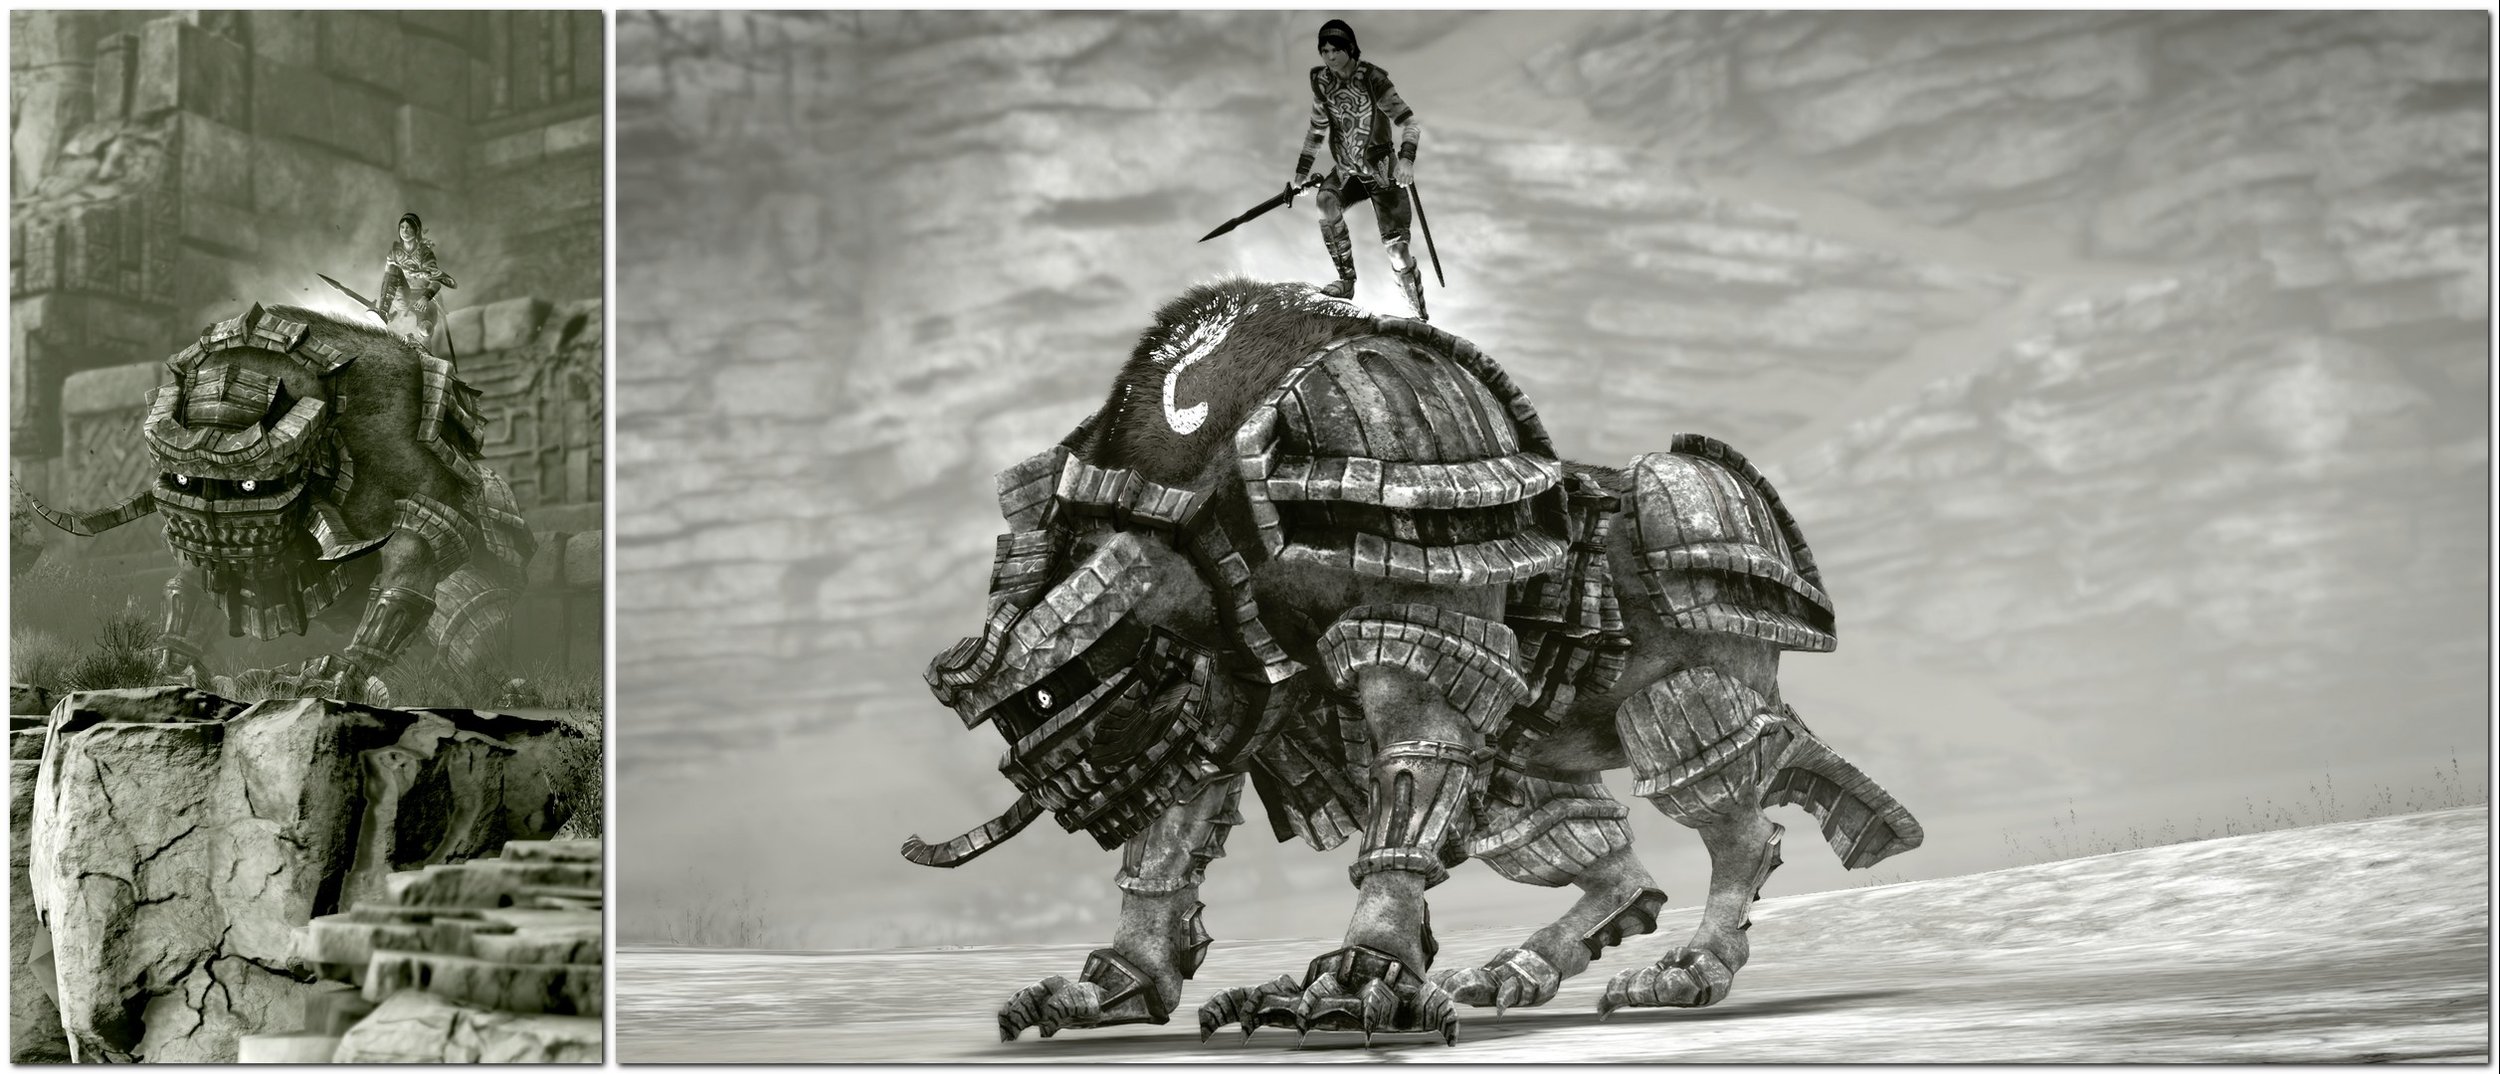
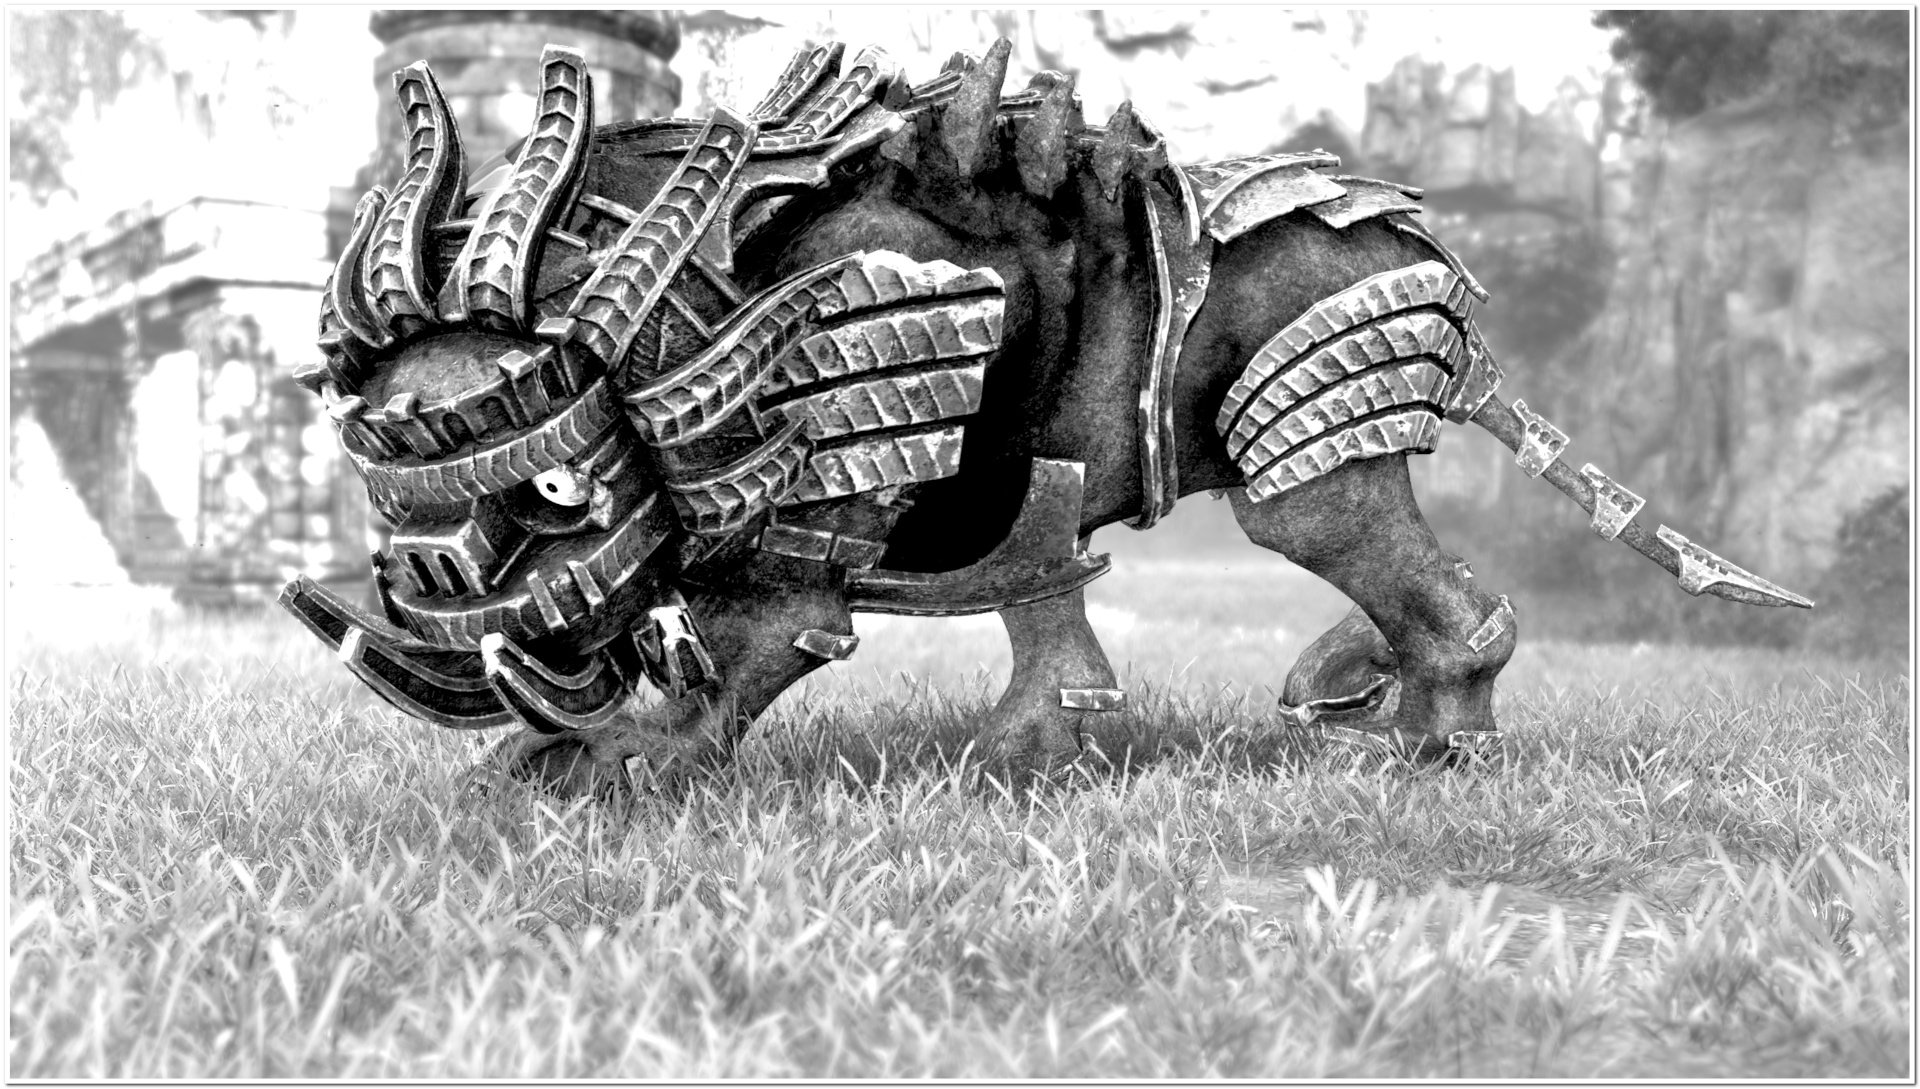
QUADRATUS - THE TAURUS MAJOR
The first colossi are quite simple to portray and Quadratus makes no exception. The arena is open with some minor obstacles and it's very easy to navigate even when riding Agro. The light is brighter than in Valus' arena so you might have to adjust brightness, exposition and contrast to your leisure. This is one of the few chances you have to play with contrast and exposition for some over-exposed black&white captures, which I like a lot for the comic-book texture it has in the end (see also my Kuromori screenshots with the same focus). Quadratus is a beautiful colossus but its real strength is the beautiful snout. Taking pictures from behind or from the side really makes no justice to its overall beauty unless you are able to include a part of its snout from the side, as I was able to do in the widescreen picture below. Because of its mass, you will probably have to include Agro or Wander (or both) in the picture because the camera is tethered to one of them and even then, you will feel the urge to push the FOV beyond the value of 40, mostly for 9:16 screenshots. Just don't fall for it or try at least to stay in the 45's otherwise Quadratus will start looking like a basset-hound of sort, skinnier and longer than the real thing, and you don't really want it. Last hint: at a certain point the colossus will stand tall on its legs exposing its weak point and trying to crash you from above. That might be an interesting moment for a vertical screenshot in case you want to try. As a matter of fact, I captured the moment just after the impact on the ground in my widescreen screenshot, where you can see Wander flipped by the shockwave near Quadratus leg.
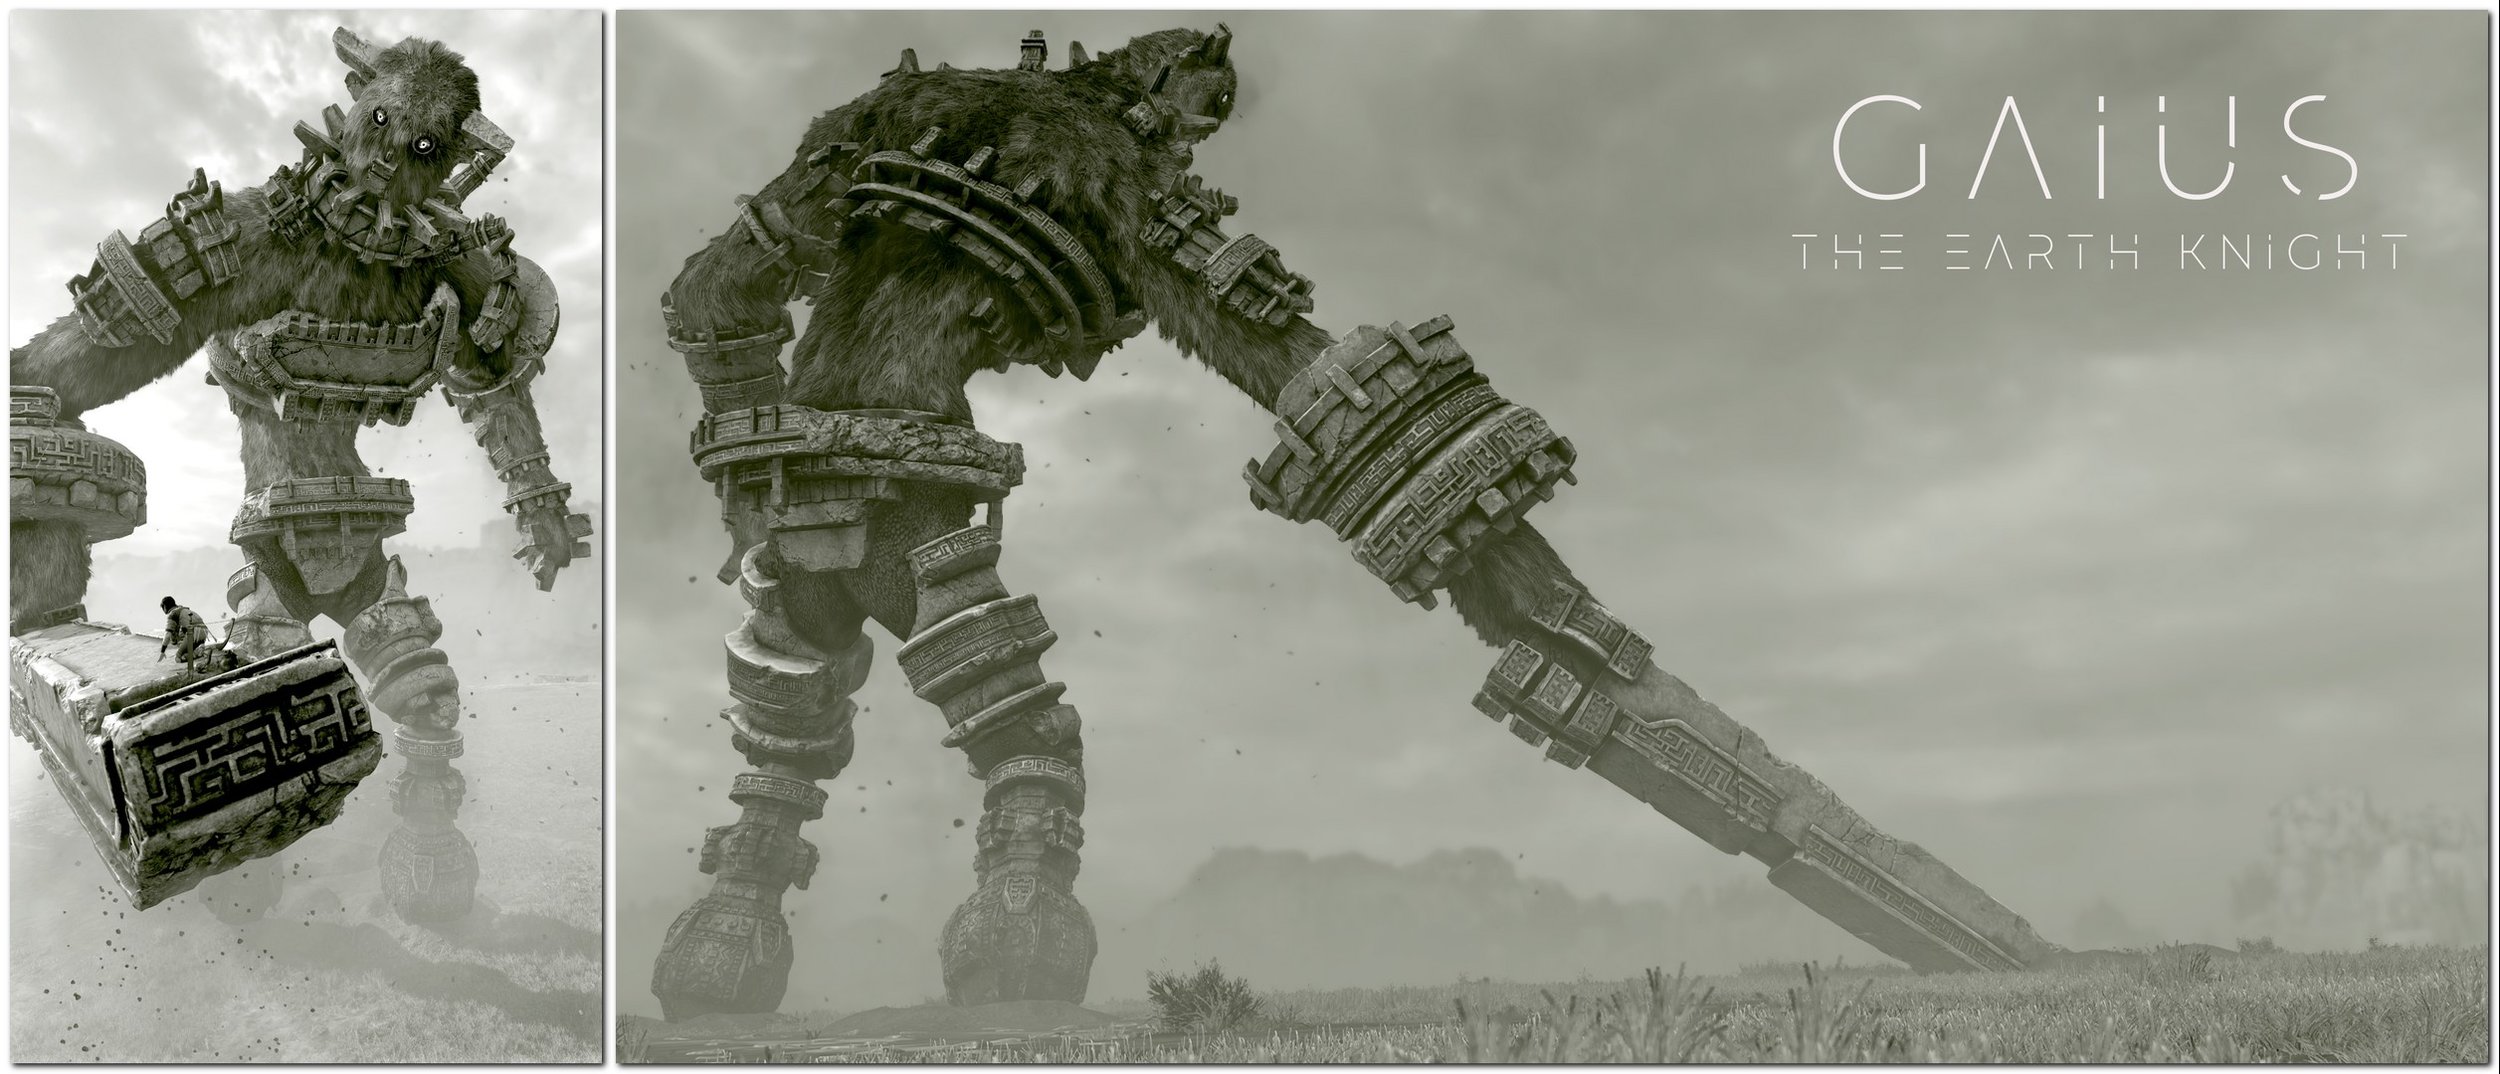
COLOSSUS #3
GAIUS - THE EARTH KNIGHT
I never read any statistics but I'm pretty sure Gaius is the most photographed colossus ever, alongside Valus. The reason is actually pretty simple: it's a beautiful colossus and it's easy to capture. The arena is totally flat and without vegetation and you can get very easy screenshots both in widescreen and in vertical framing. This is also the reason why all the screenshots in the internet look the same and if you think about it that's a real pity. Even if Gaius patterns are actually limited, virtual photography is "being creative" and as a community we should be able to create different kind of content from the same basic materials. That's why I suggest you not to settle for the easiest shots but always aim to something more personal and different and unique. For example: during the fight, at a certain point, you will be able to climb on Gaius hammer. From that position you can have some truly fresh vertical shots capturing the earth knight in all its figure with a little camera work. In my case, you'll see in the picture below that I also captured Gaius looking straight at Wander. These are the little details that add something extra to the whole composition. A screenshot of Gaius looking away or looking unfocused would have much less impact on the public. For the widescreen capture I choosed to portray Gaius from the side. This is not an easy shot as it seems, because from the moment Gaius attacks to the moment it withdraws its hammer you have about 10 seconds to run away from the attack and flank the colossus far enough to take a screenshot with the proper Field Of View. However, this composition might not be as stylish (as I think) for each one of you, that's why you could also consider to fill the upper right corner with some kind of post-production, for example with the name and class of the titan using a stylized font.
COLOSSUS #4
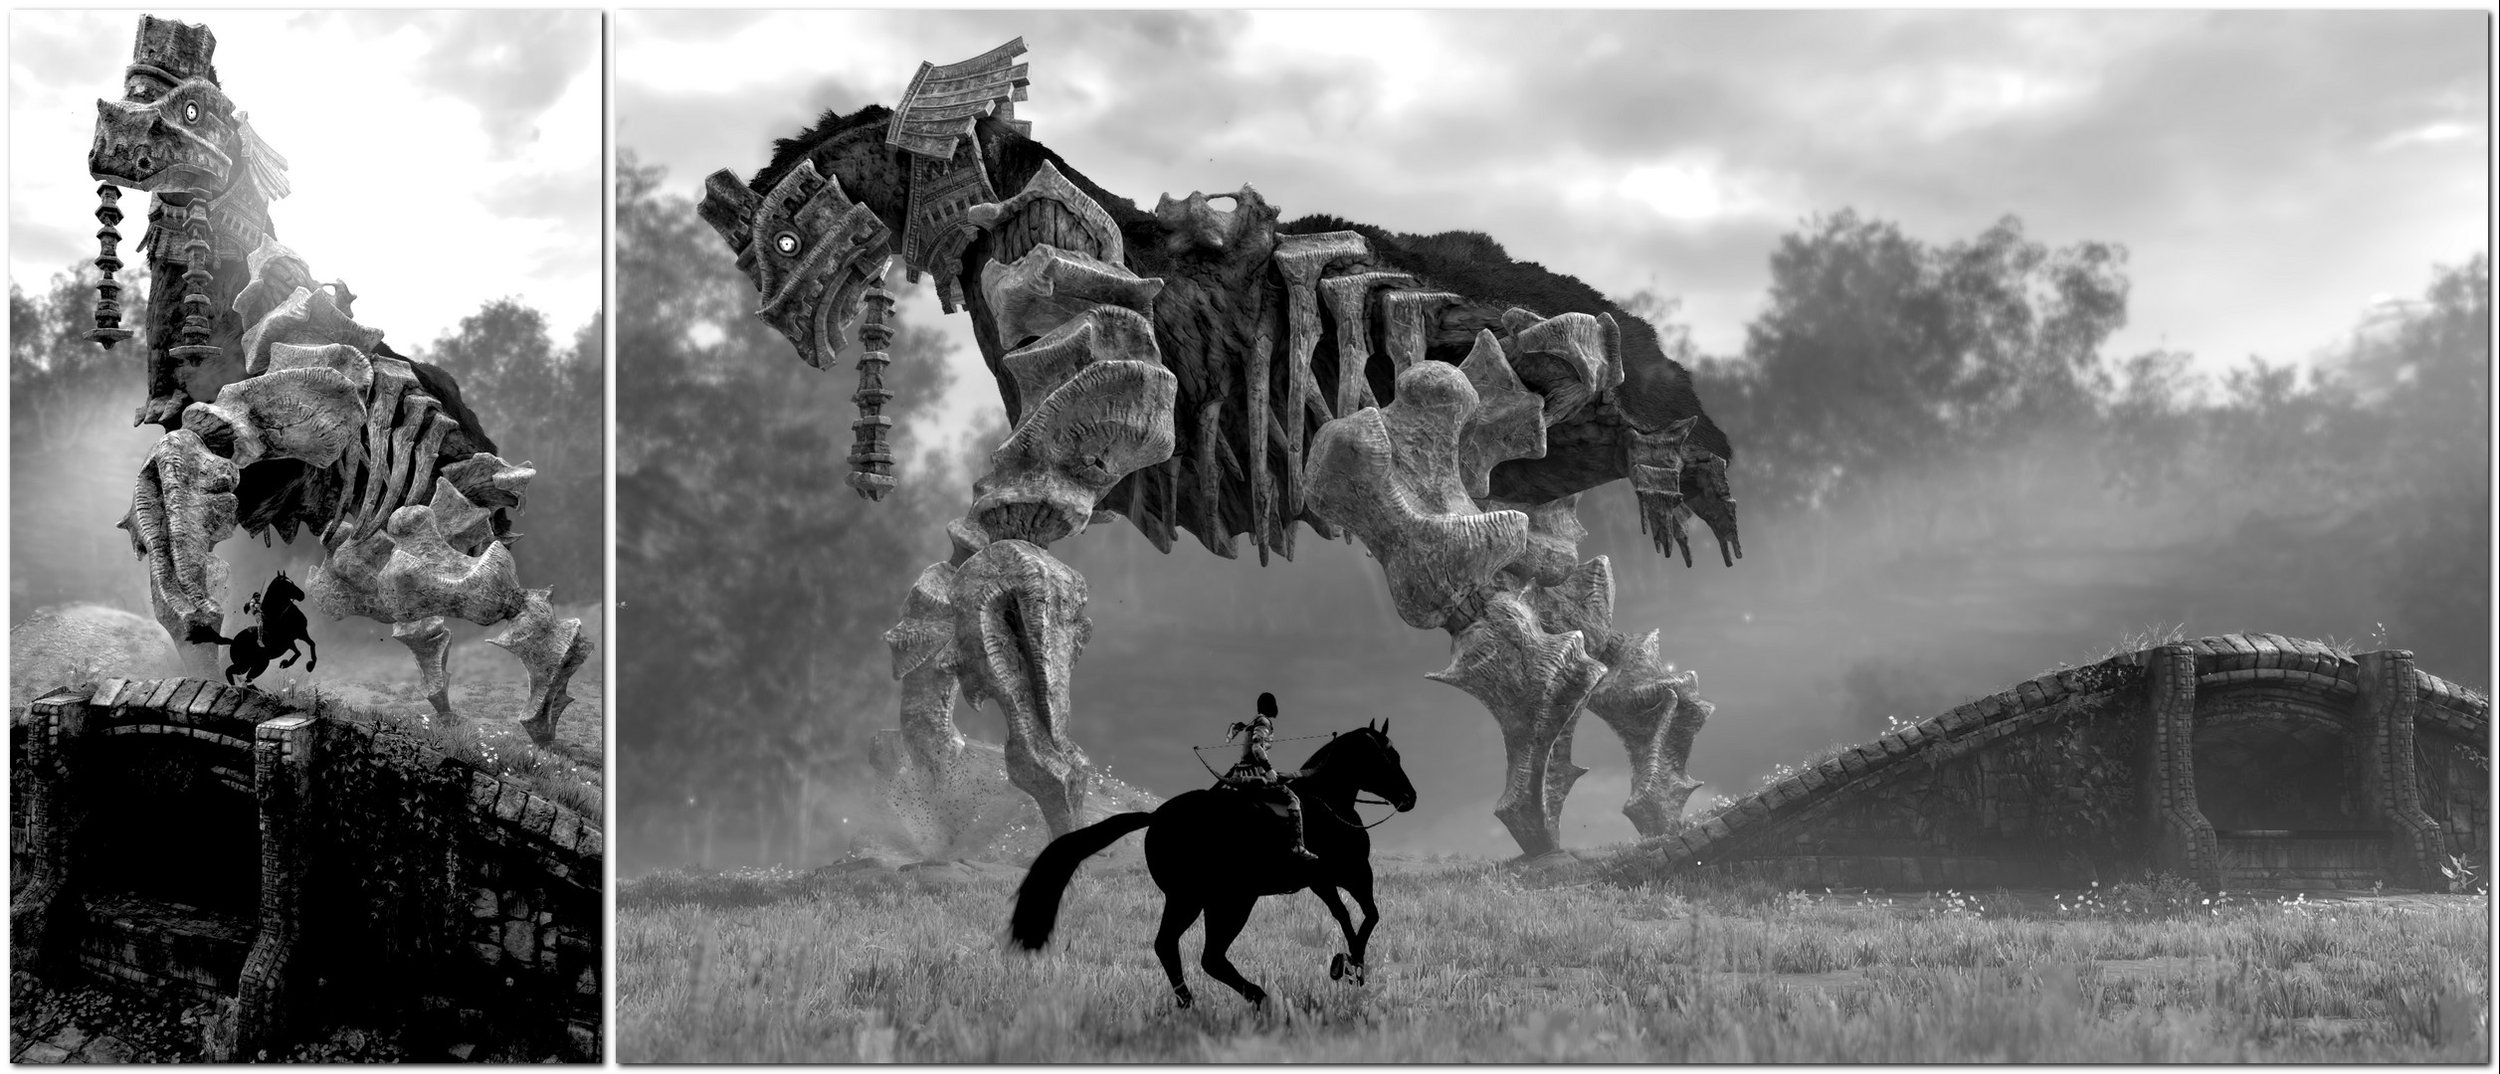
PHAEDRA - THE EQUUS PRIME
Following the footsteps of the first three colossi, Phaedra is yet another easy colossus to capture. If the whole game is built around the concept to slowly make you feel guilty for killing pure and innocent titans, Phaedra will make you start doubting your actions since it's really impossible to die because of it. The Equus Prime has only one move that can harm Agro and Wander: a stomp. The sloppiest and slowest stomp you have ever seen in a videogame. The lack of danger and action is a problem for the willing virtual photographer because it poses the old age question: how can you get an interesting shot if the main character does literally nothing but trotting around? The answer is easy: you have to rely on form rather than substance. For this reason I would suggest you to focus your photography on the 3 main elements of the whole scenery: Phaedra, Wander (on Agro) and the barrows that are central to the puzzle that will lead to the killing of the equine deity. For the widescreen shot I’d say it’s vital to make a clean, full frontal capture right in front of the main subjects. Phaedra has wonderfully designed body parts so you should wait the titan to turn around until it shows its best profile from head to tail. Agro is also central in the composition so it has to sport a graceful and tonic gallop, which is not always easy to get on film. The same should go for the vertical screenshot with one crucial difference: the shot has to be taken from a higher ground with the eye of the public going from Phaedra’s head to the entrance of the barrows.
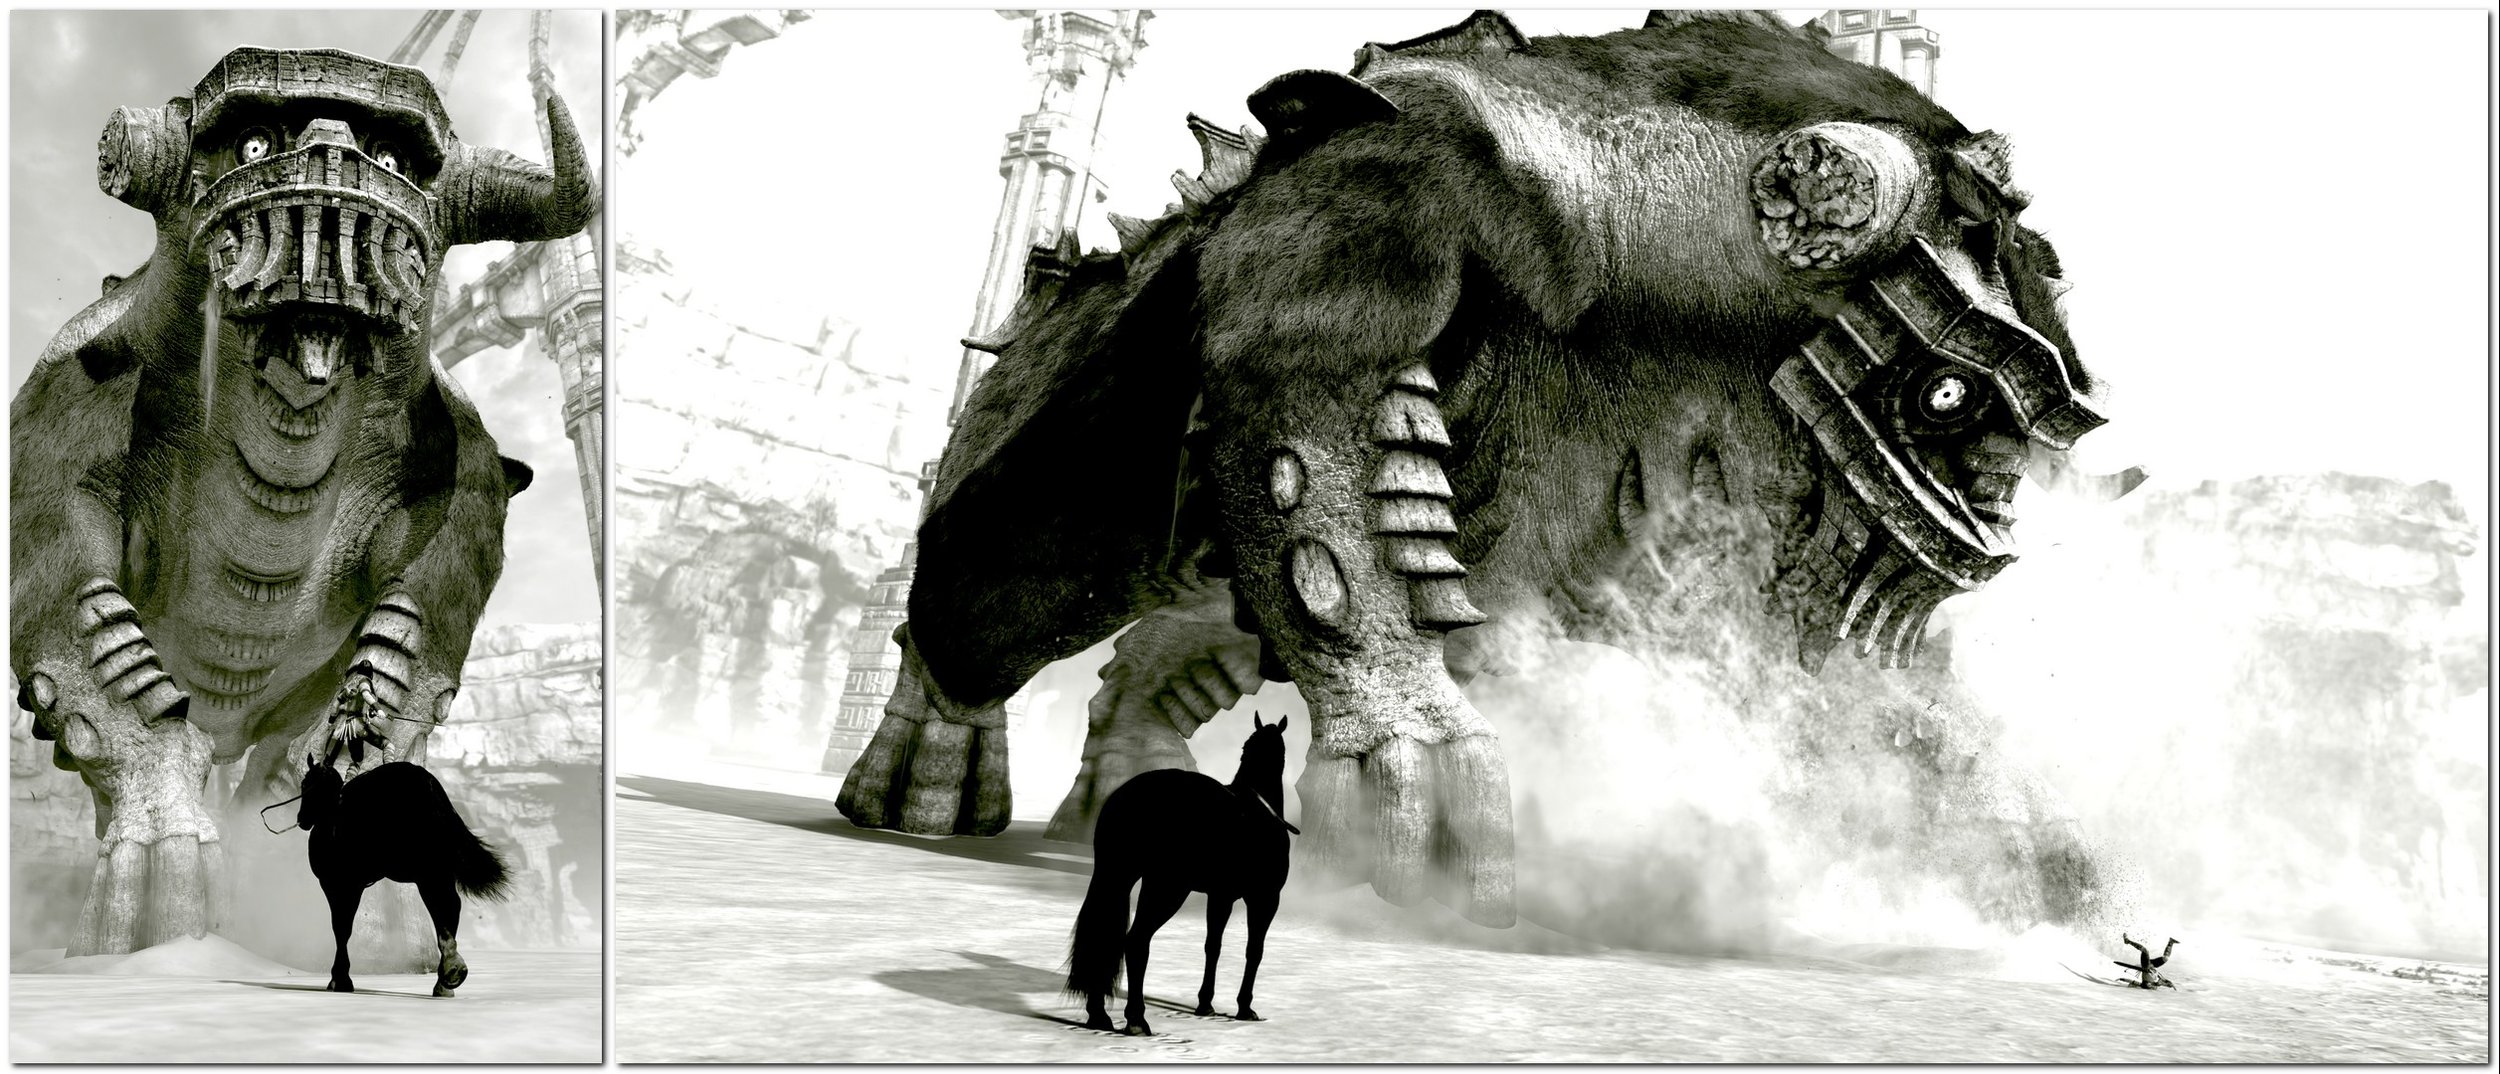
COLOSSUS #5
AVION - THE DELTA PHOENIX
Meet Avion, the first colossus that will have you doubting about the feasibility of a good, high-quality gallery of all the 16 colossi. As a Virtual Photographer, I don't get to decide only if I want to portray the colossus from the back, from the side, or fully frontal. I get to decide also in which part of the arena I can get the best composition. The “furnishing elements” and the lighting inside the arena matter a lot in the composition of a good screenshot. But with Avion suddenly the task becomes tricky because the whole arena revolves around you riding a flying bird while barely having an idea of your real position on the map. This is why, during my many playthroughs, I came up with some ideas centered on capturing Avion from the ground. My first tip for you is that you can hit Avion with an arrow as soon as you get on the main platform of the arena, where the cutscene starts. From there, you can take quite easily some early screenshots of Avion flying towards your position but, to be honest, they do not show any of the beauty of the flying titan. Another solution I came up with, is that while swinning to the platforms from which you will hijack Avion, you can get some decent pictures from underwater portraying the full body of the bird but, of course, we are talking about high-distance, highly-blurred shots. But these, to be honest, are tips and tricks for photographers that don't like too much of a hassle. If you want a good, closer picture of Avion, you have to hijack the bird and be ready for a wild ride. The crucial tip that you need to know is that for some reasons, as you try to move the camera around Wander and Avion, at a certain point something will break and the camera will bounce back straight in Wander's lungs. Just think your camera is knotted to a giant rubberband, and when the rubberband reaches a certain tension the camera is bouncing back where it is tethered. There is only one safe advice I can give you that allows some kind of micro-management: changing Wander placement on Avion’s upper part of the body. If you duck Wander near Avion's neck you will have some pretty decent widescreen shots, if you make him cling to one of the wings you can have a good vertical shot.
COLOSSUS #6
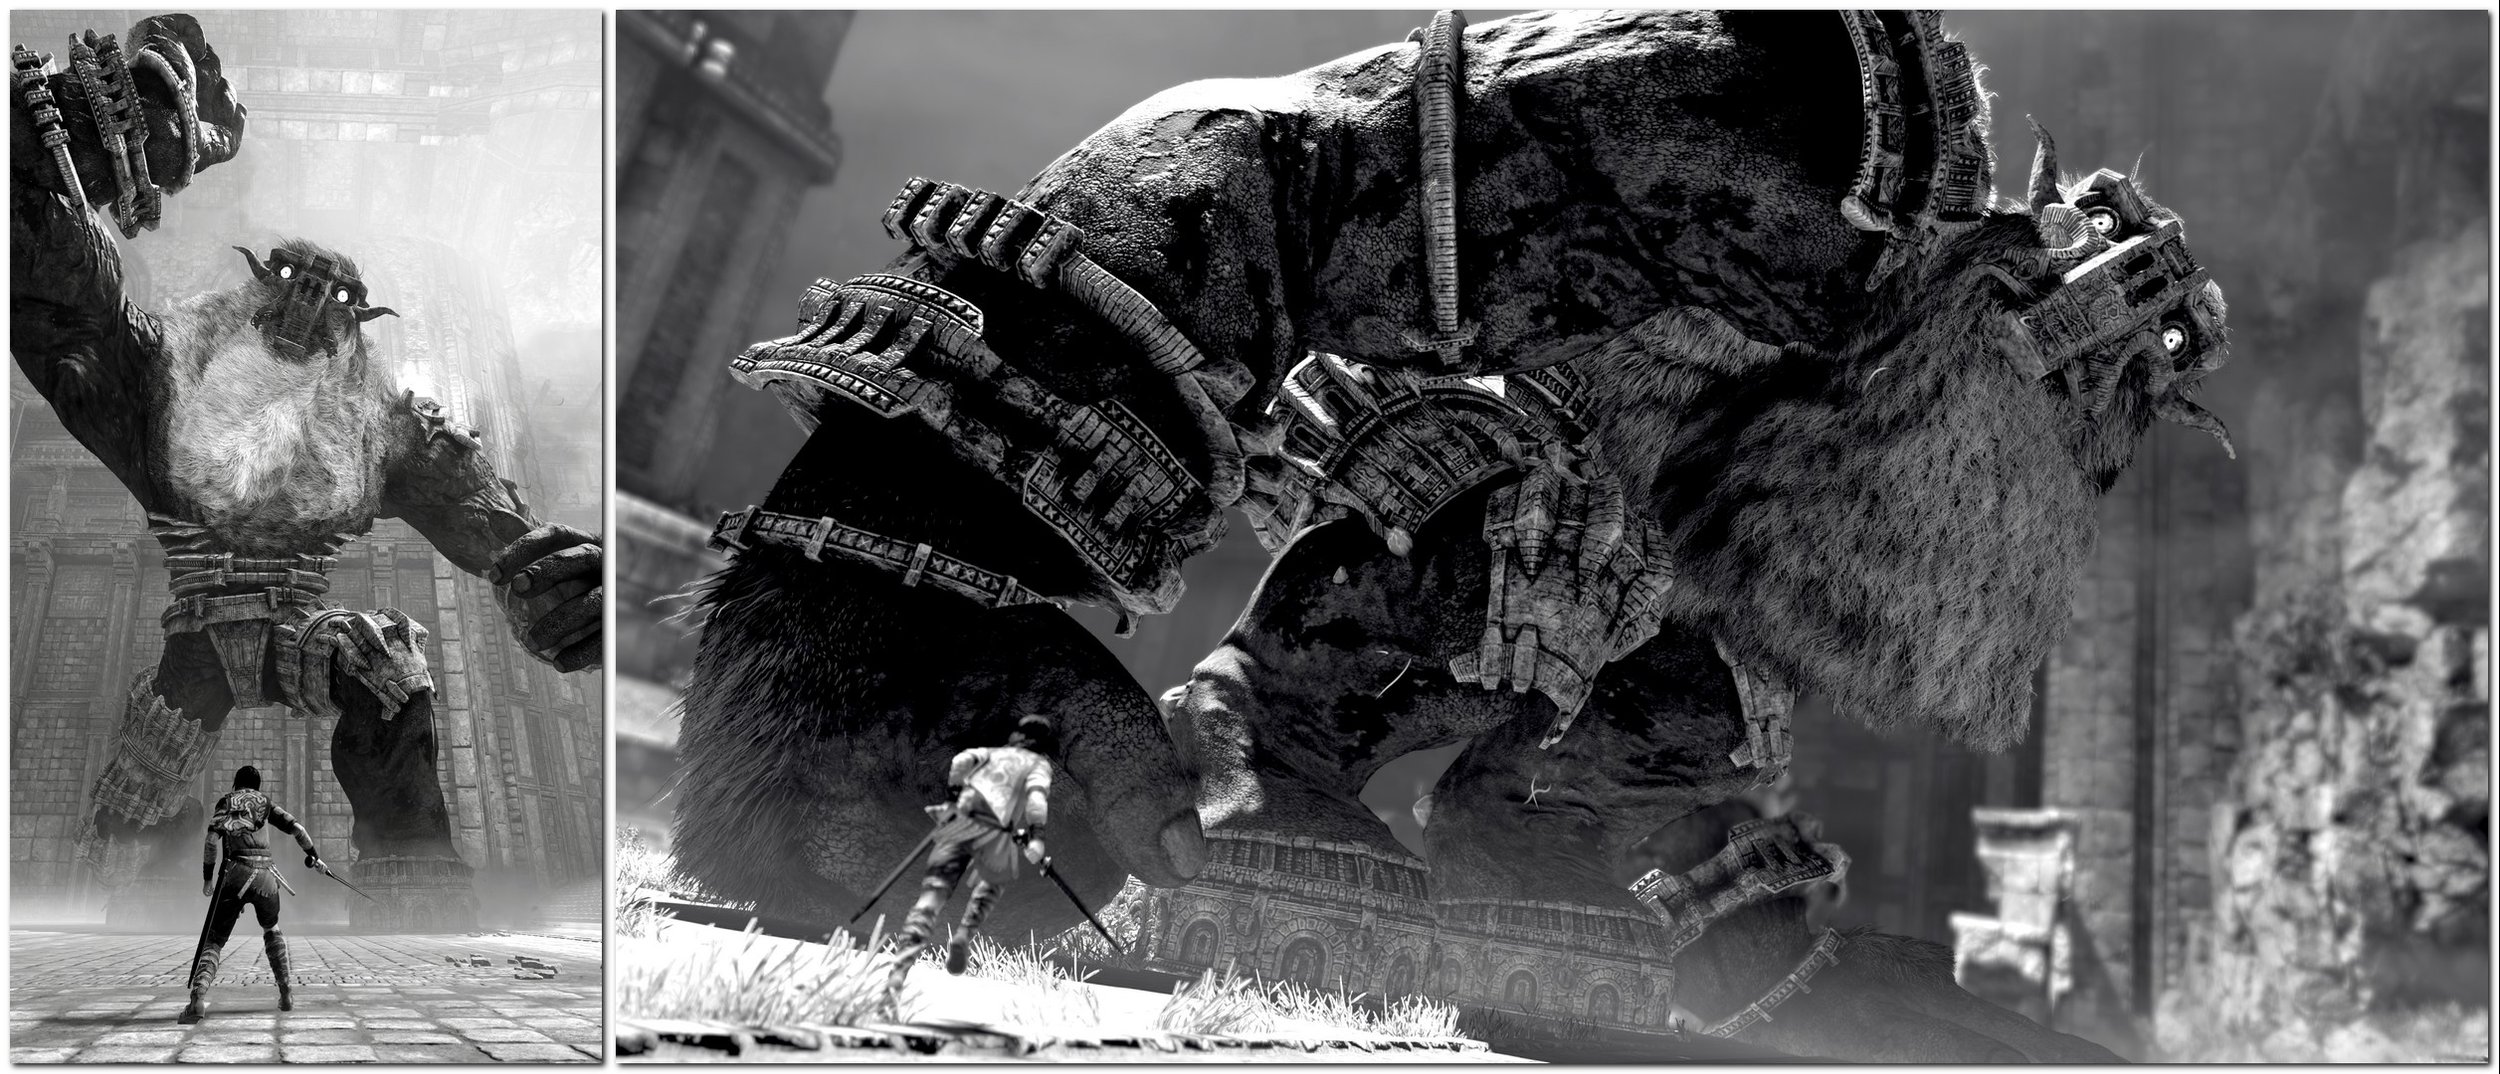
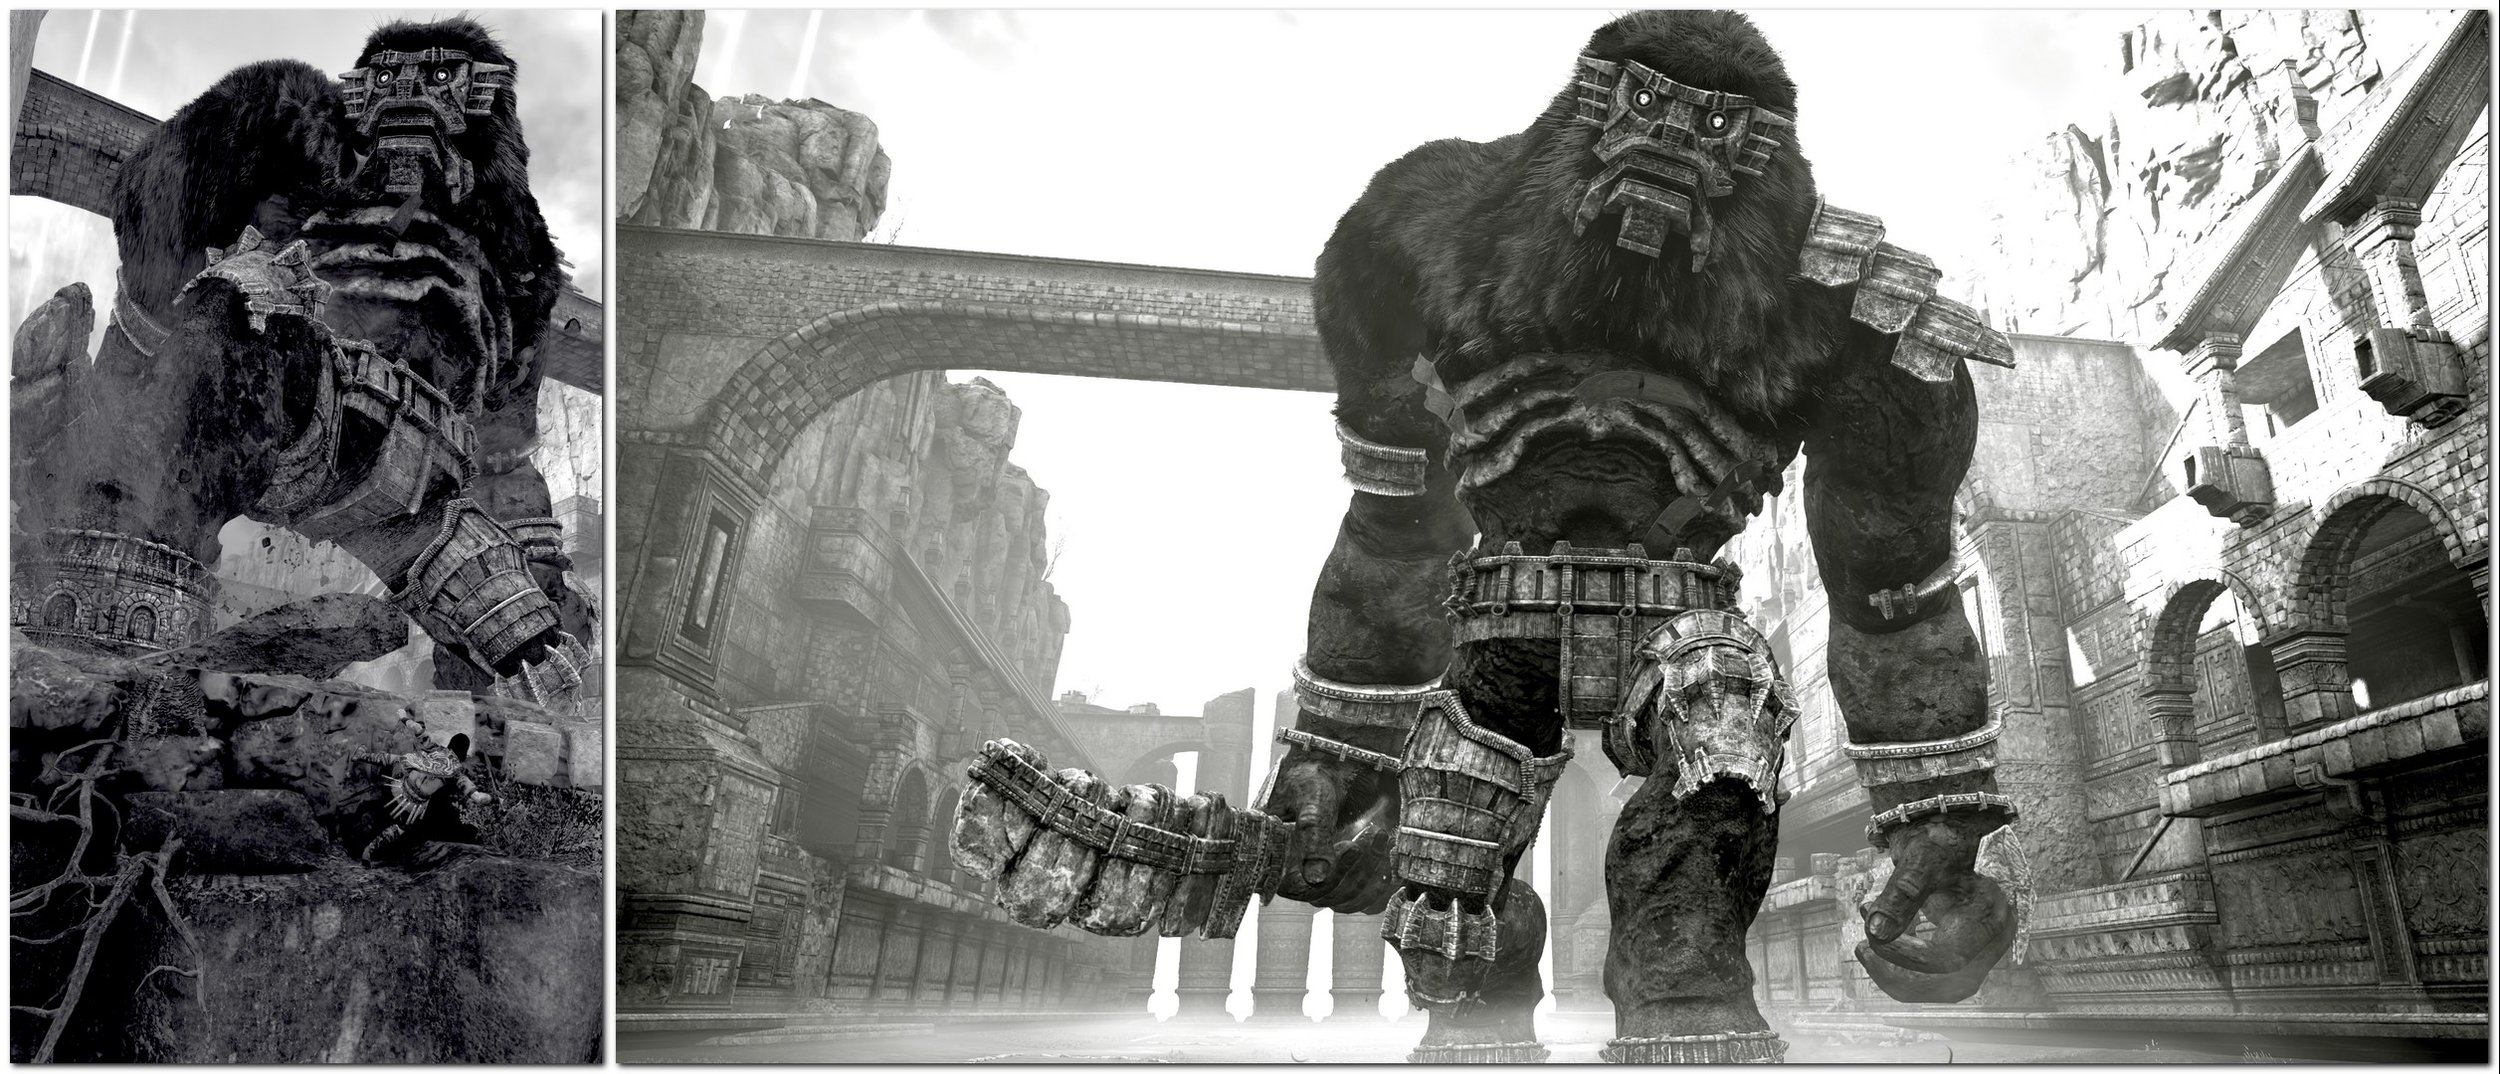
BARBA - THE GOLIATH
Barba (“Beard”, in italian) is a hirsute colossus roaming an underground shrine. The temple is roughly square, not particularly big in volume and with a light surce in a corner. The best lighting in the sanctuary, mostly for B&W pictures, is in the first half, where Barba appears from behind a giant gate. The spotlight in the second half makes rather difficult adjusting the settings so unless you plan some work on contrasts, you have to lure the titan in the wider and darker first half of the temple. Barba has very few animations you can rely on for action shots: a stomp and a crushing punch. Avoiding the punch and getting Barba on its knees is easily the best way to have a nice vertical shot without forcing the FOV to unwelcome degrees. Widescreen shots are inevitably more static because any action taken by Barba is so wide in scope that it's impossible to freeze it on film without some kind of distortion or aberration of the lines. In other words: Barba is huge, he reacts only when Wander is nearby and no "right" FOV can capture some action in widescreen. I’m going to show you two possible approaches to capturing Barba’s Beauty: an “easy” approach and a a more complex but rewarding one. In the first one Barba is simply standing in the frame looking as cool as possible. In the vertical shot it is possible to enjoy the awesome lighting of the entrance area of the temple, in the widescreen one I tried to create some depth and movement including Wander in the framing running towards the camera. The slight tilt encreases the sense of motion in a screenshots otherwise quite mundane. Then we have a more complex but rewarding approach. In the vertical capture I was able to get Barba on its knees in the moment he’s launching the crashing punch attack, and I was able to get a picture full of power, tension and danger. The Black and white approach almost reminds an artwork of sorts and that’s always my preferred outcome when I do virtual photography. You could be able to get an alternative awesome shot also at the end of the motion, when the punch hits the ground, if you want to try something different. In the 16:9 framing I lured Barba near the puzzle area when you get its beard to a ground level. As soon as he got in position I ran to flank him, then ran towards him and then launched the photo mode. What you see here is a very rare picture of Barba’s full body, looking at Wander (always a nice touch to spice up the shot), with a nice depth and sense of movement. But there’s a problem: the FOV of 45 and the strong tilt concur to some visual distortion and aberration. You don’t feel easy, you don’t feel confortable when looking at this shot, because your eyes and your brain detect some mistakes both in composition and framing. But overall, at least for me, the uniqueness and originality of this shot are way more important than a slight “mistake” (due to the photo mode limitations) in pleasing the eye. My tip, in this case, is to be careful and choose the approach you feel more at ease with. As I wrote before, it’s quite difficult to portray Barba in the 16:9 format with a correct FOV, so you have to decide if you want to sacrifice form or substance.
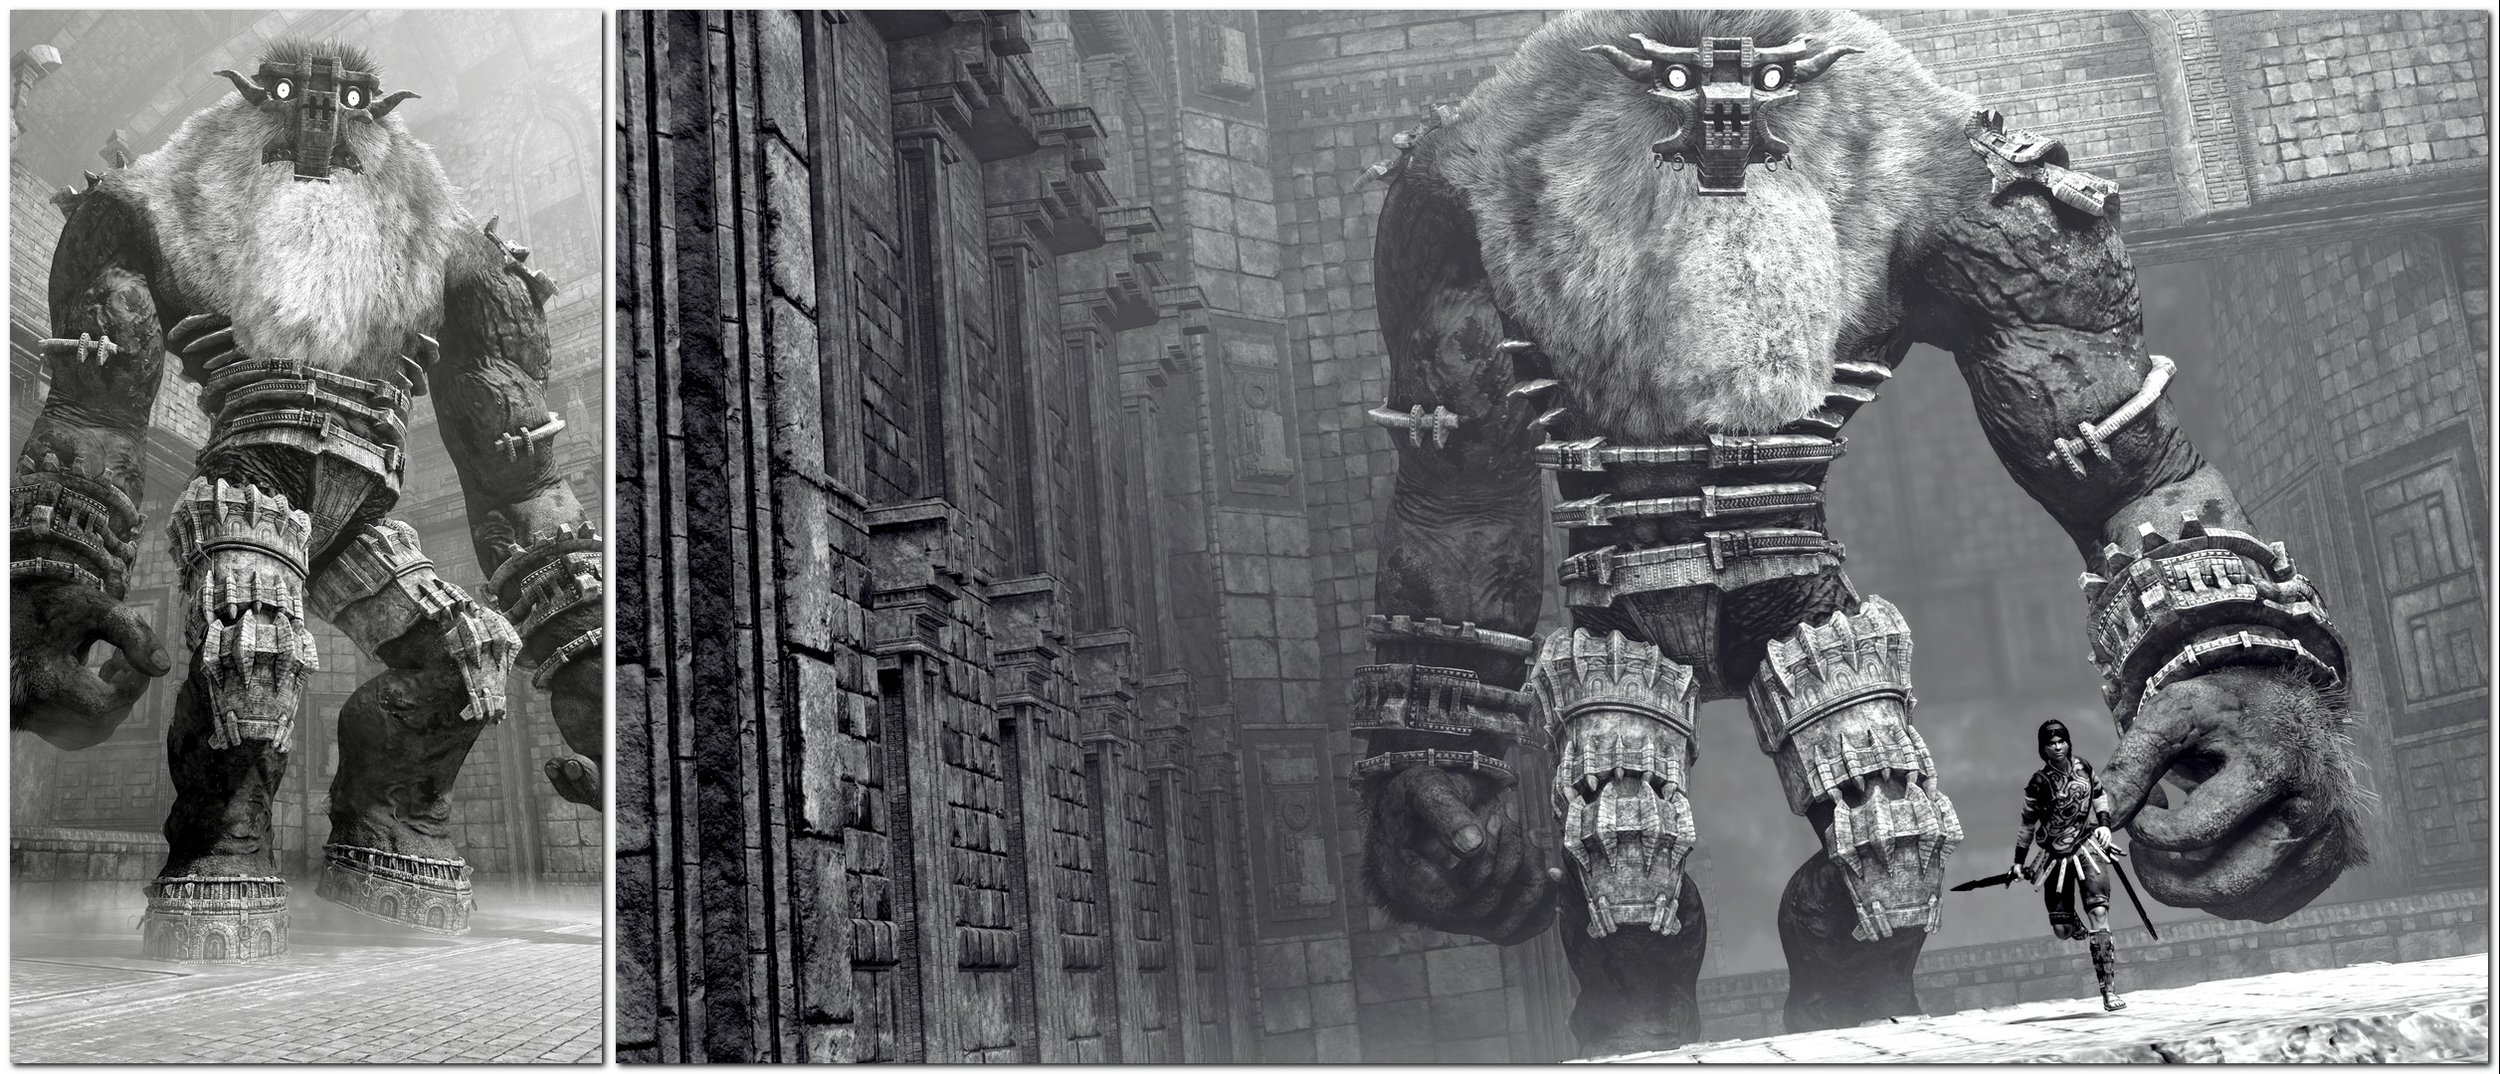
This is the very easy and simple photographic approach to the sixth colossus: a vertical portrait shot enjoying the perfect lighting of the early half of the shrine, and a horizontal shot that is quite mundane but at the same time has the right FOV and enjoys some depth and momentum thanks to Wander running towards the camera with a little added tilt.
This is my personal choice, a harder but most rewarding approach: a vertical framing full of movement and power, and a horizontal framing that captures a very unique moment and position of Barba in its whole shape while looking at Wander (always a welcome extra that gives more flavor to the screenshot)
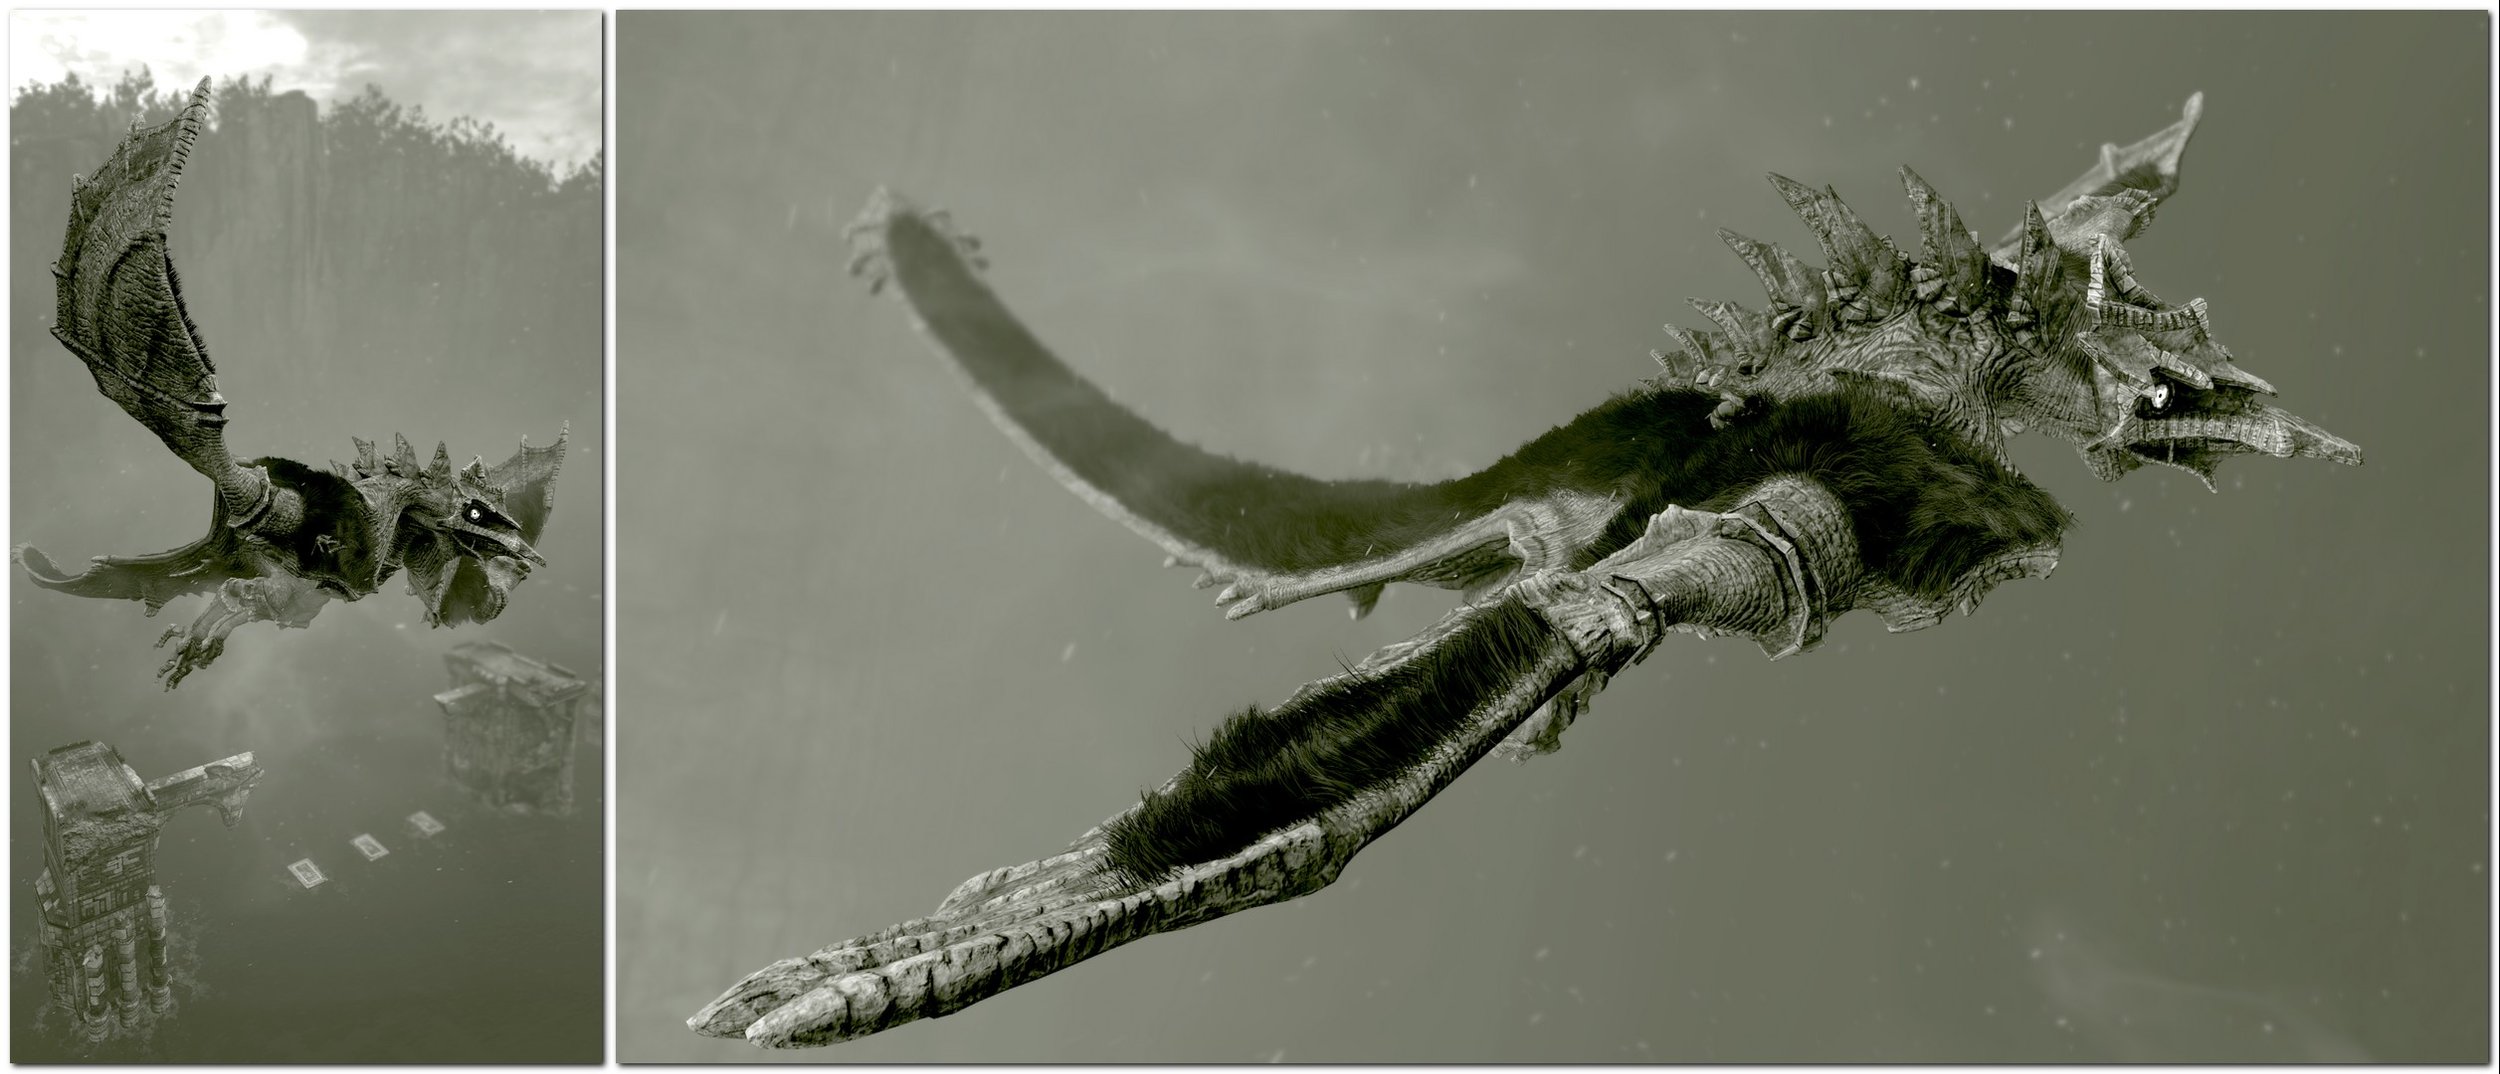
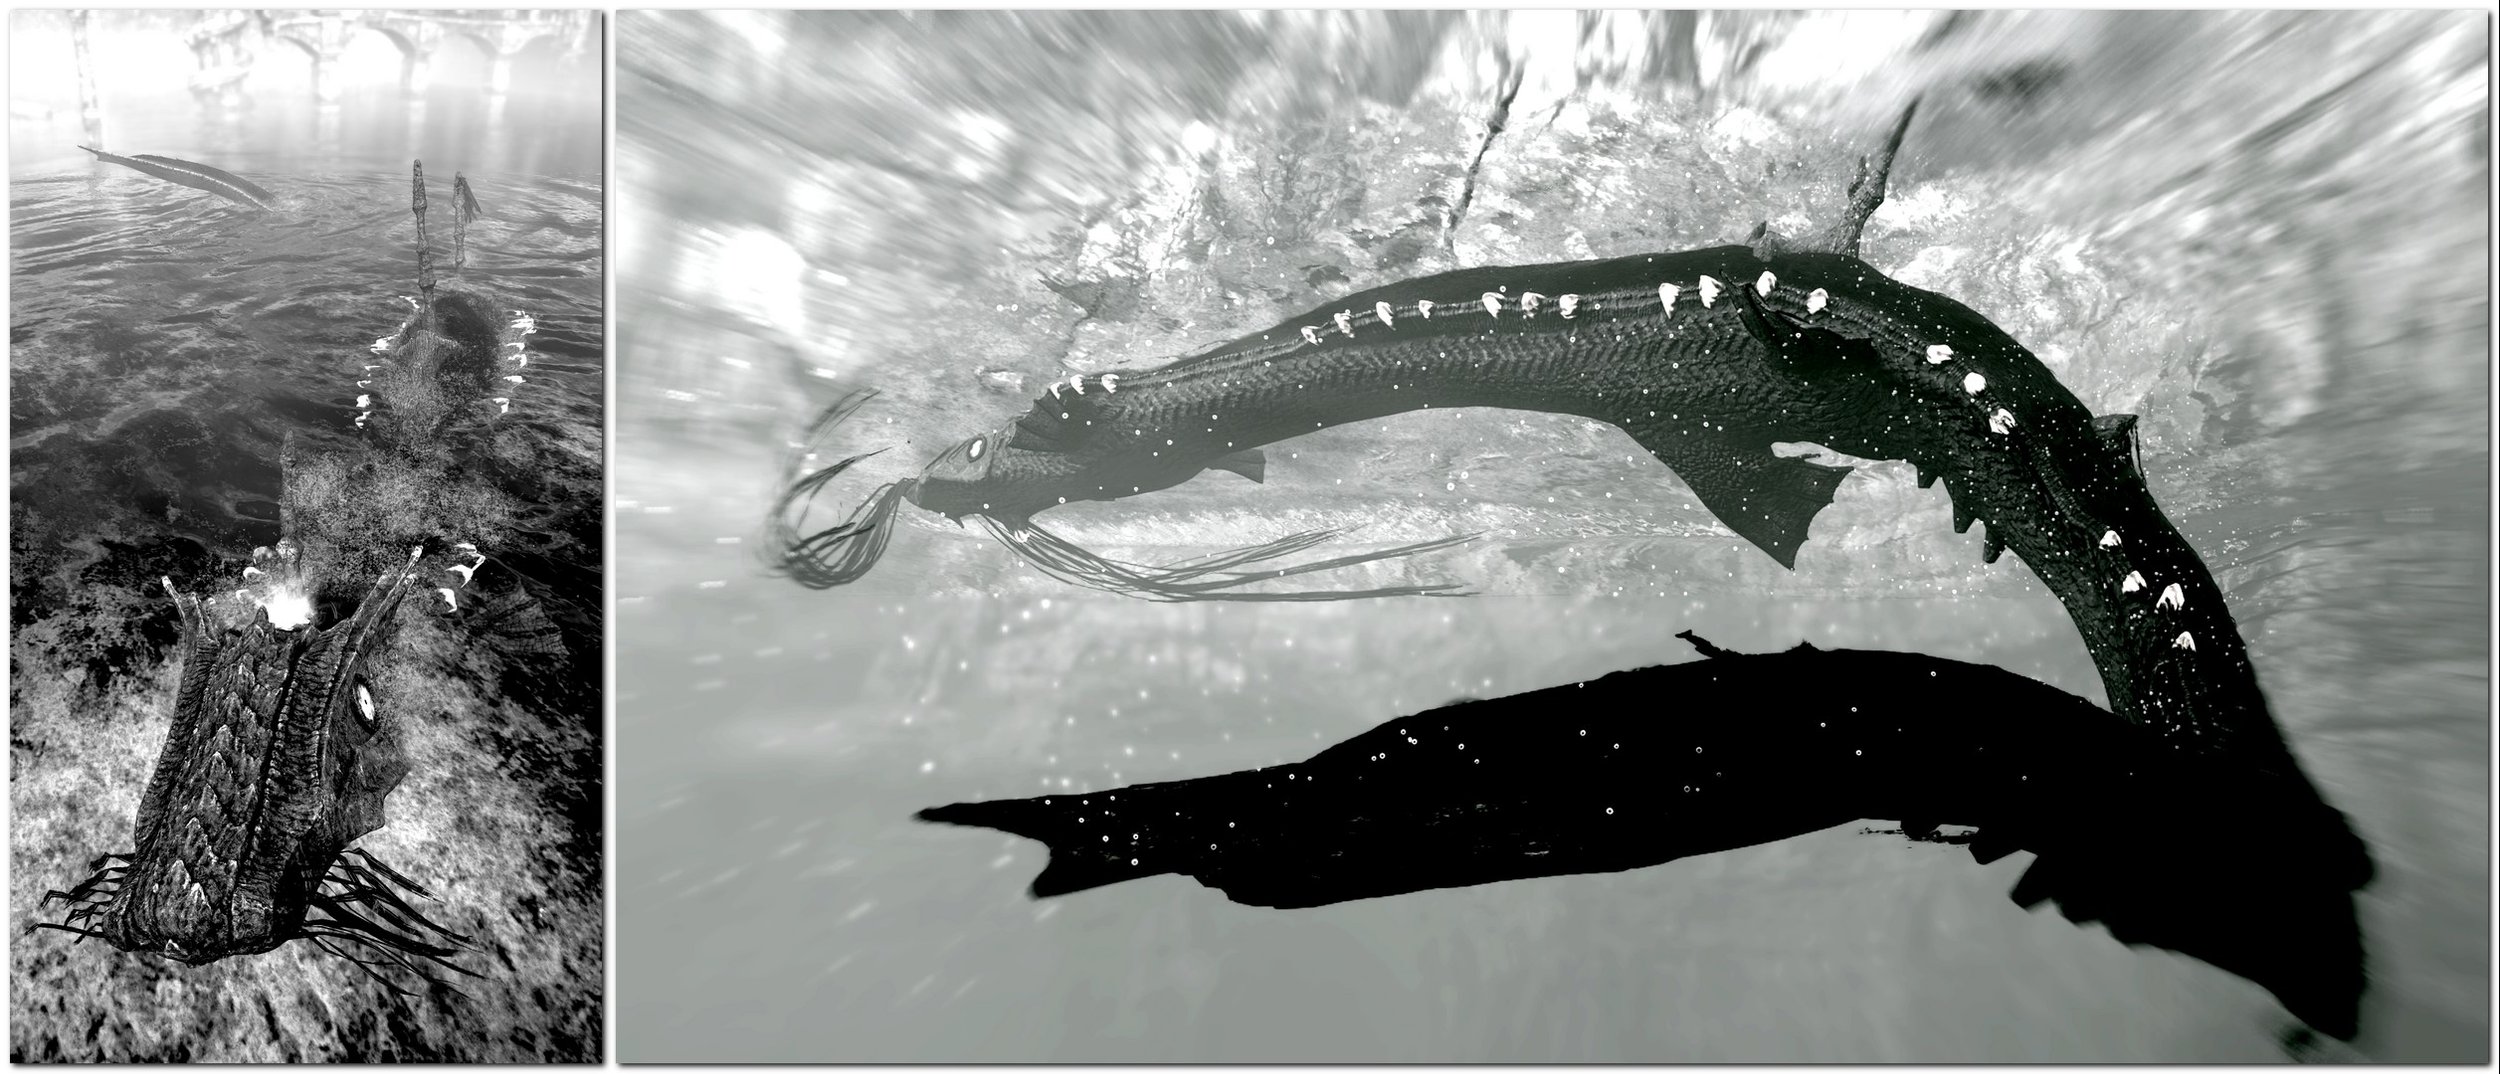
COLOSSUS #7
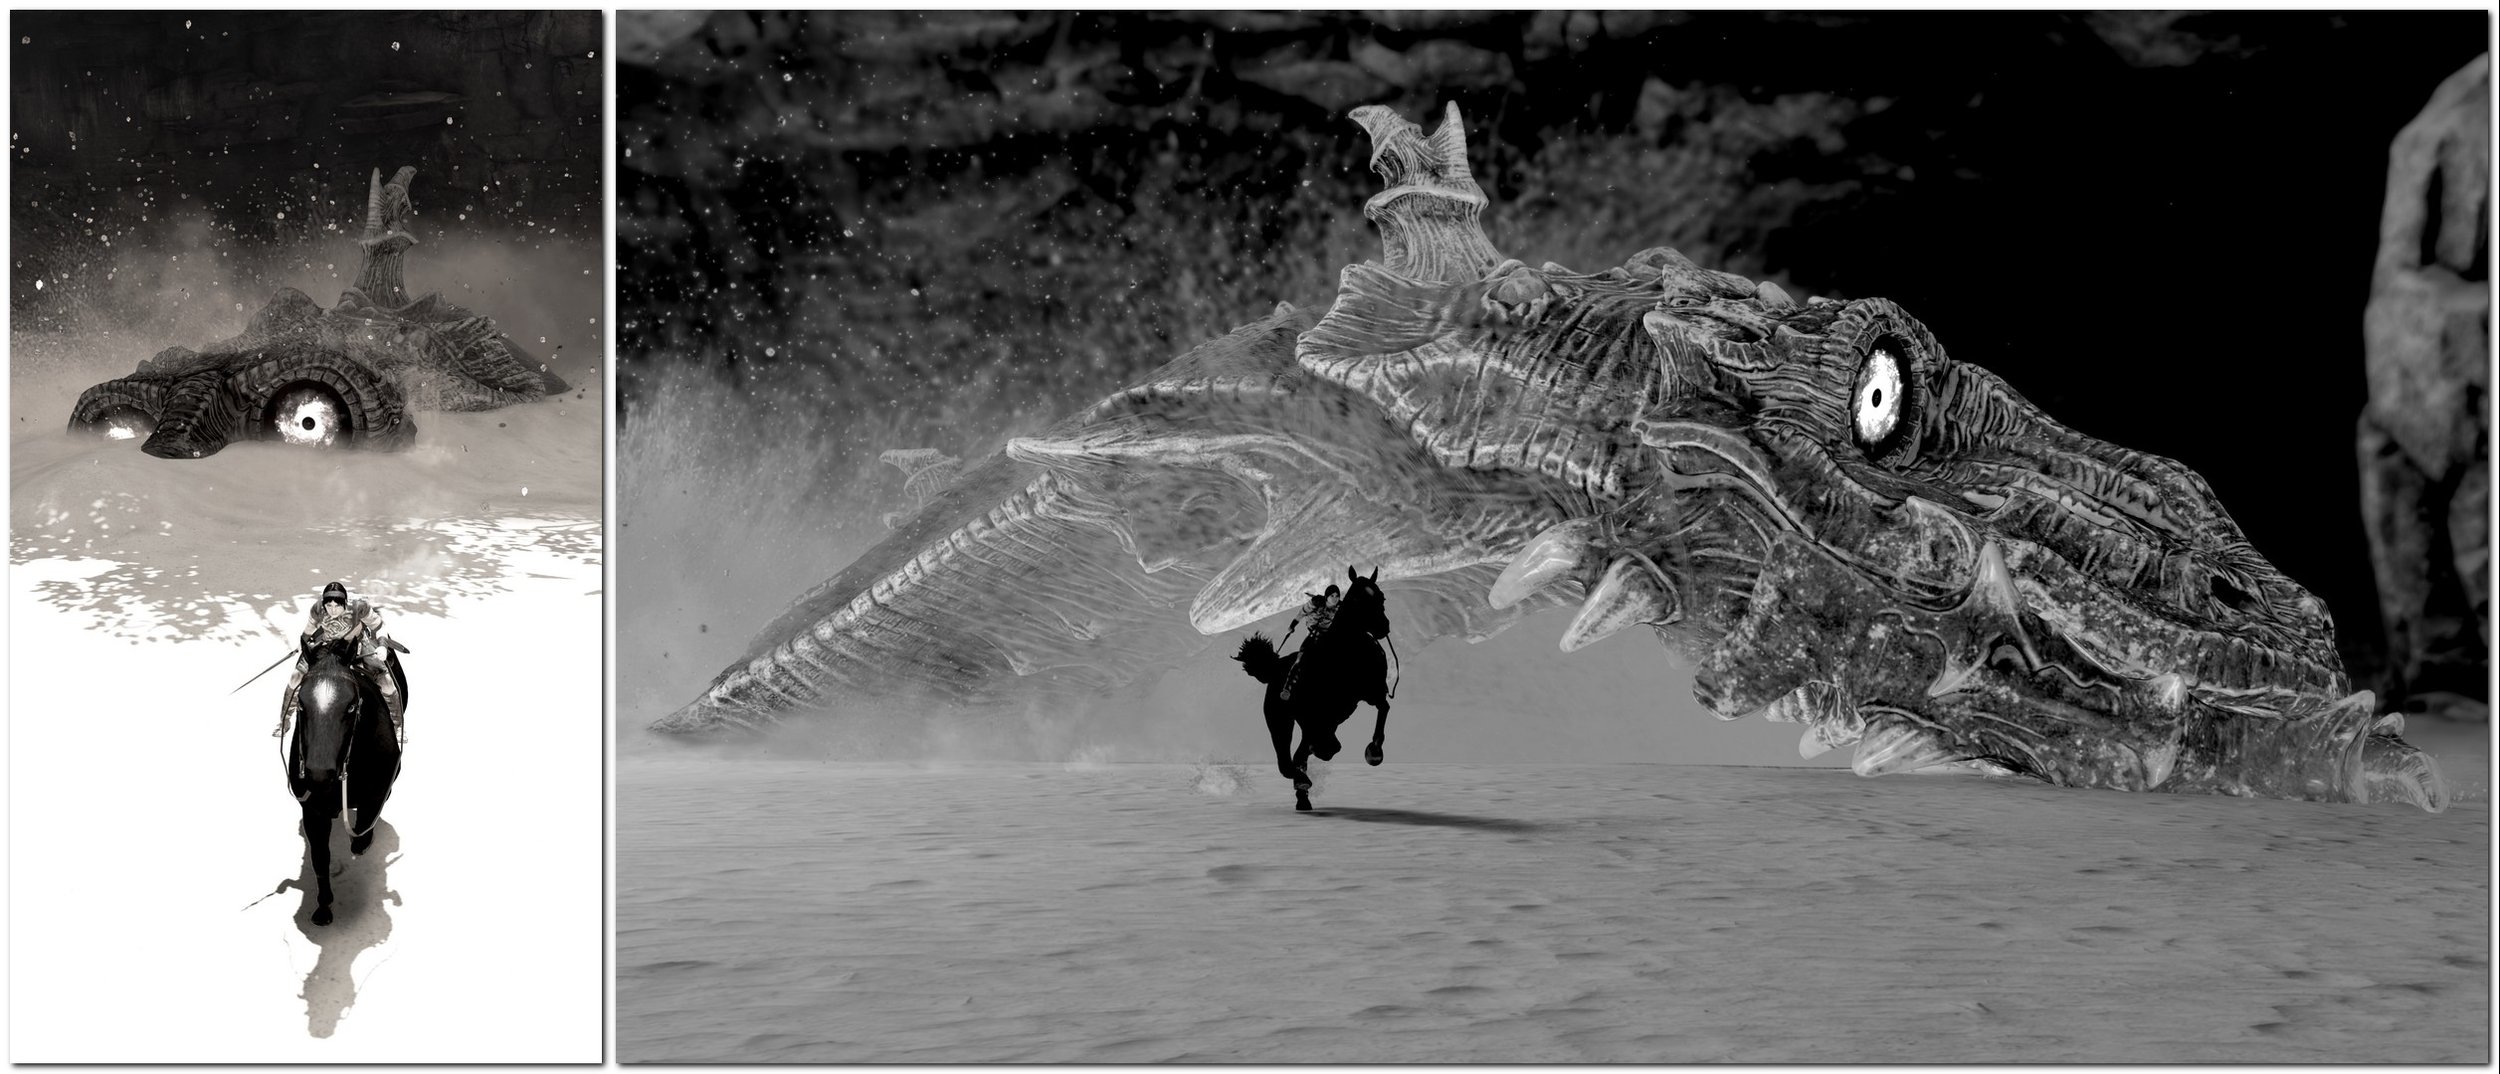
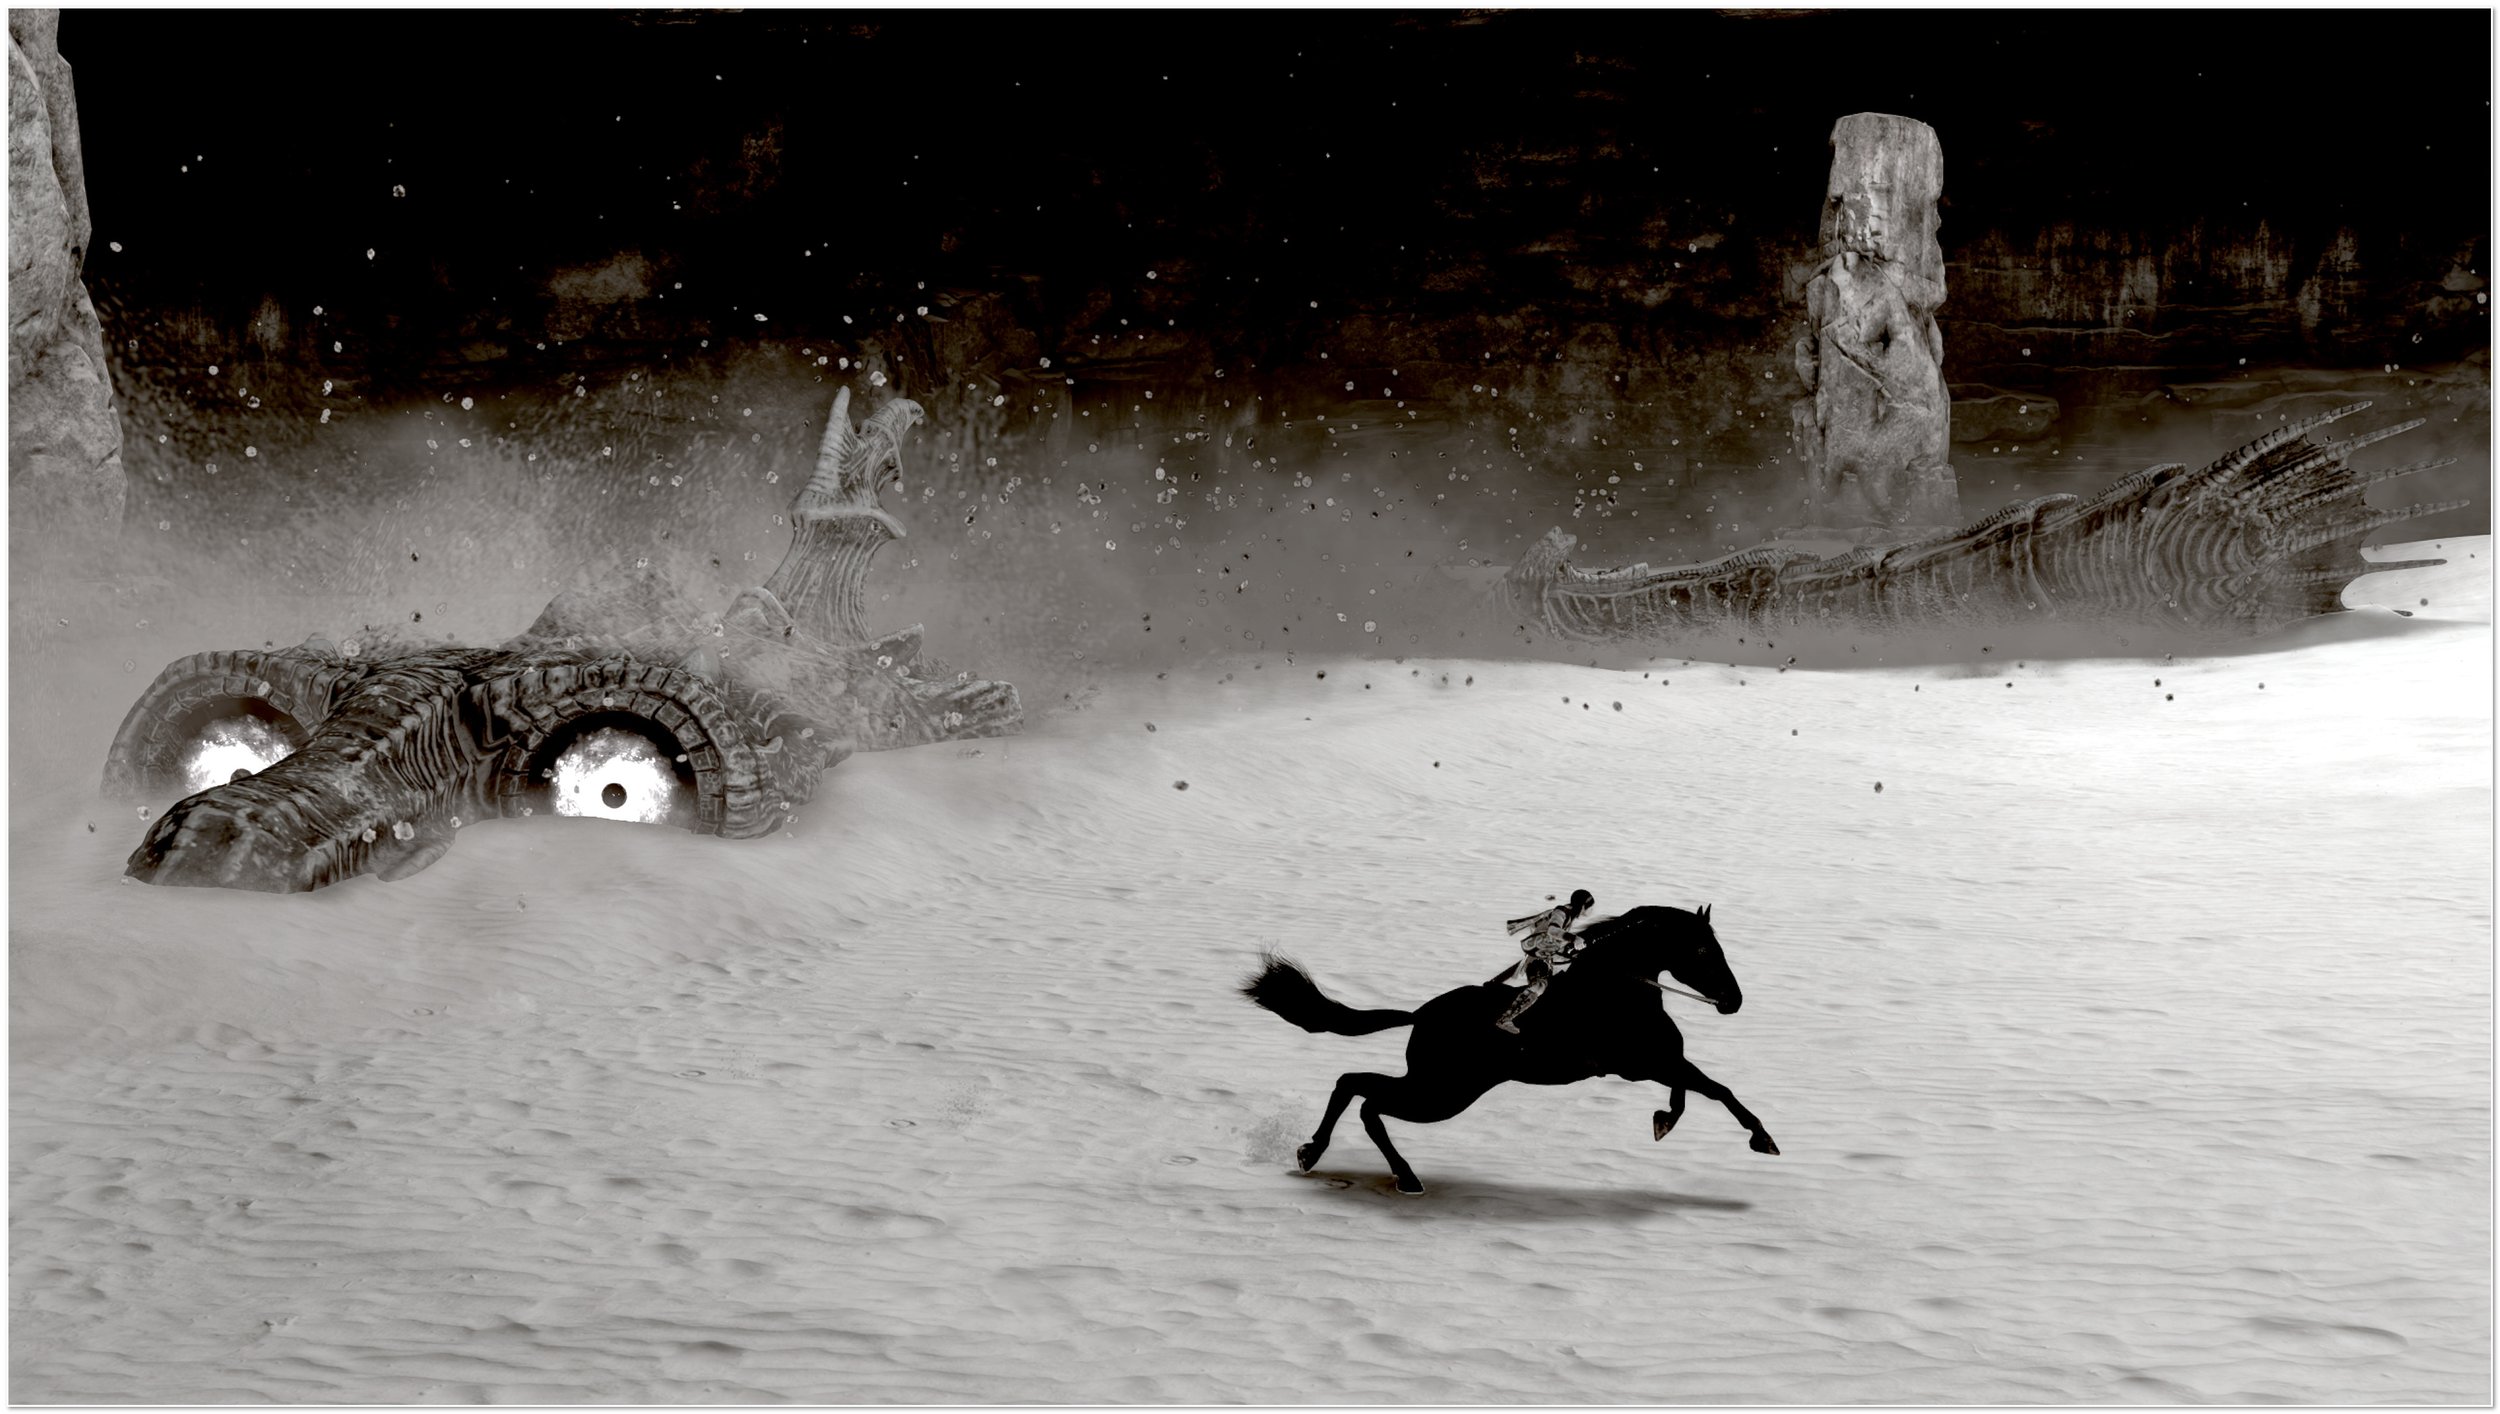
HYDRUS - THE SEA DRAGON
There are two crucial informations you have to know about the seventh colossus Hydrus: 1) it stays underwater for a good half of the time and it's very hard to get clean, non-blurry captures below water surface 2) when above the surface, it sports a wavelike movement to trigger its self-defense by electrocution and this means you can't have full-body pictures from that position. For these reasons, Hydrus is considered one of the most frustrating colossi out there and one of the most difficult to portray full stop. As you can see in the strip below, I was however able to get two pretty decent-looking captures and here are my tips for you. The widescreen, full-body picture was taken from under the water surface, jumping from Hydrus’ body into the lake while it was taking a bend. I have to say, I was quite fortunate to get the full body and the eye and a non-too-blurry capture of the sea dragon all in one. Concerning the vertical framing, it is crucial to place Wander right on the colossus skull. The rubberband-effect of the photo mode camera is truly obnoxious with big-size colossi like Hydrus (Hydrus and Avion have very similar responses to camera placement) but if you place Wander in the right spot and you aim for a vertical screenshot, with some well-rewarded patience you can easily get a nice screenshot.
The vertical screenshot is clean but nothing special to be honest, the widescreen one on the contrary is a welcome addition to my “best of” horizontal screenshots.

2 Bonus shots: you can have a full-body picture of Hydrus also from water level, but it will always feel partial and somehow incomplete. Wander’s placement on Hydrus is vital to avoid the photo mode rubberband-effect when you try to make distance between the camera and the colossus
COLOSSUS #8
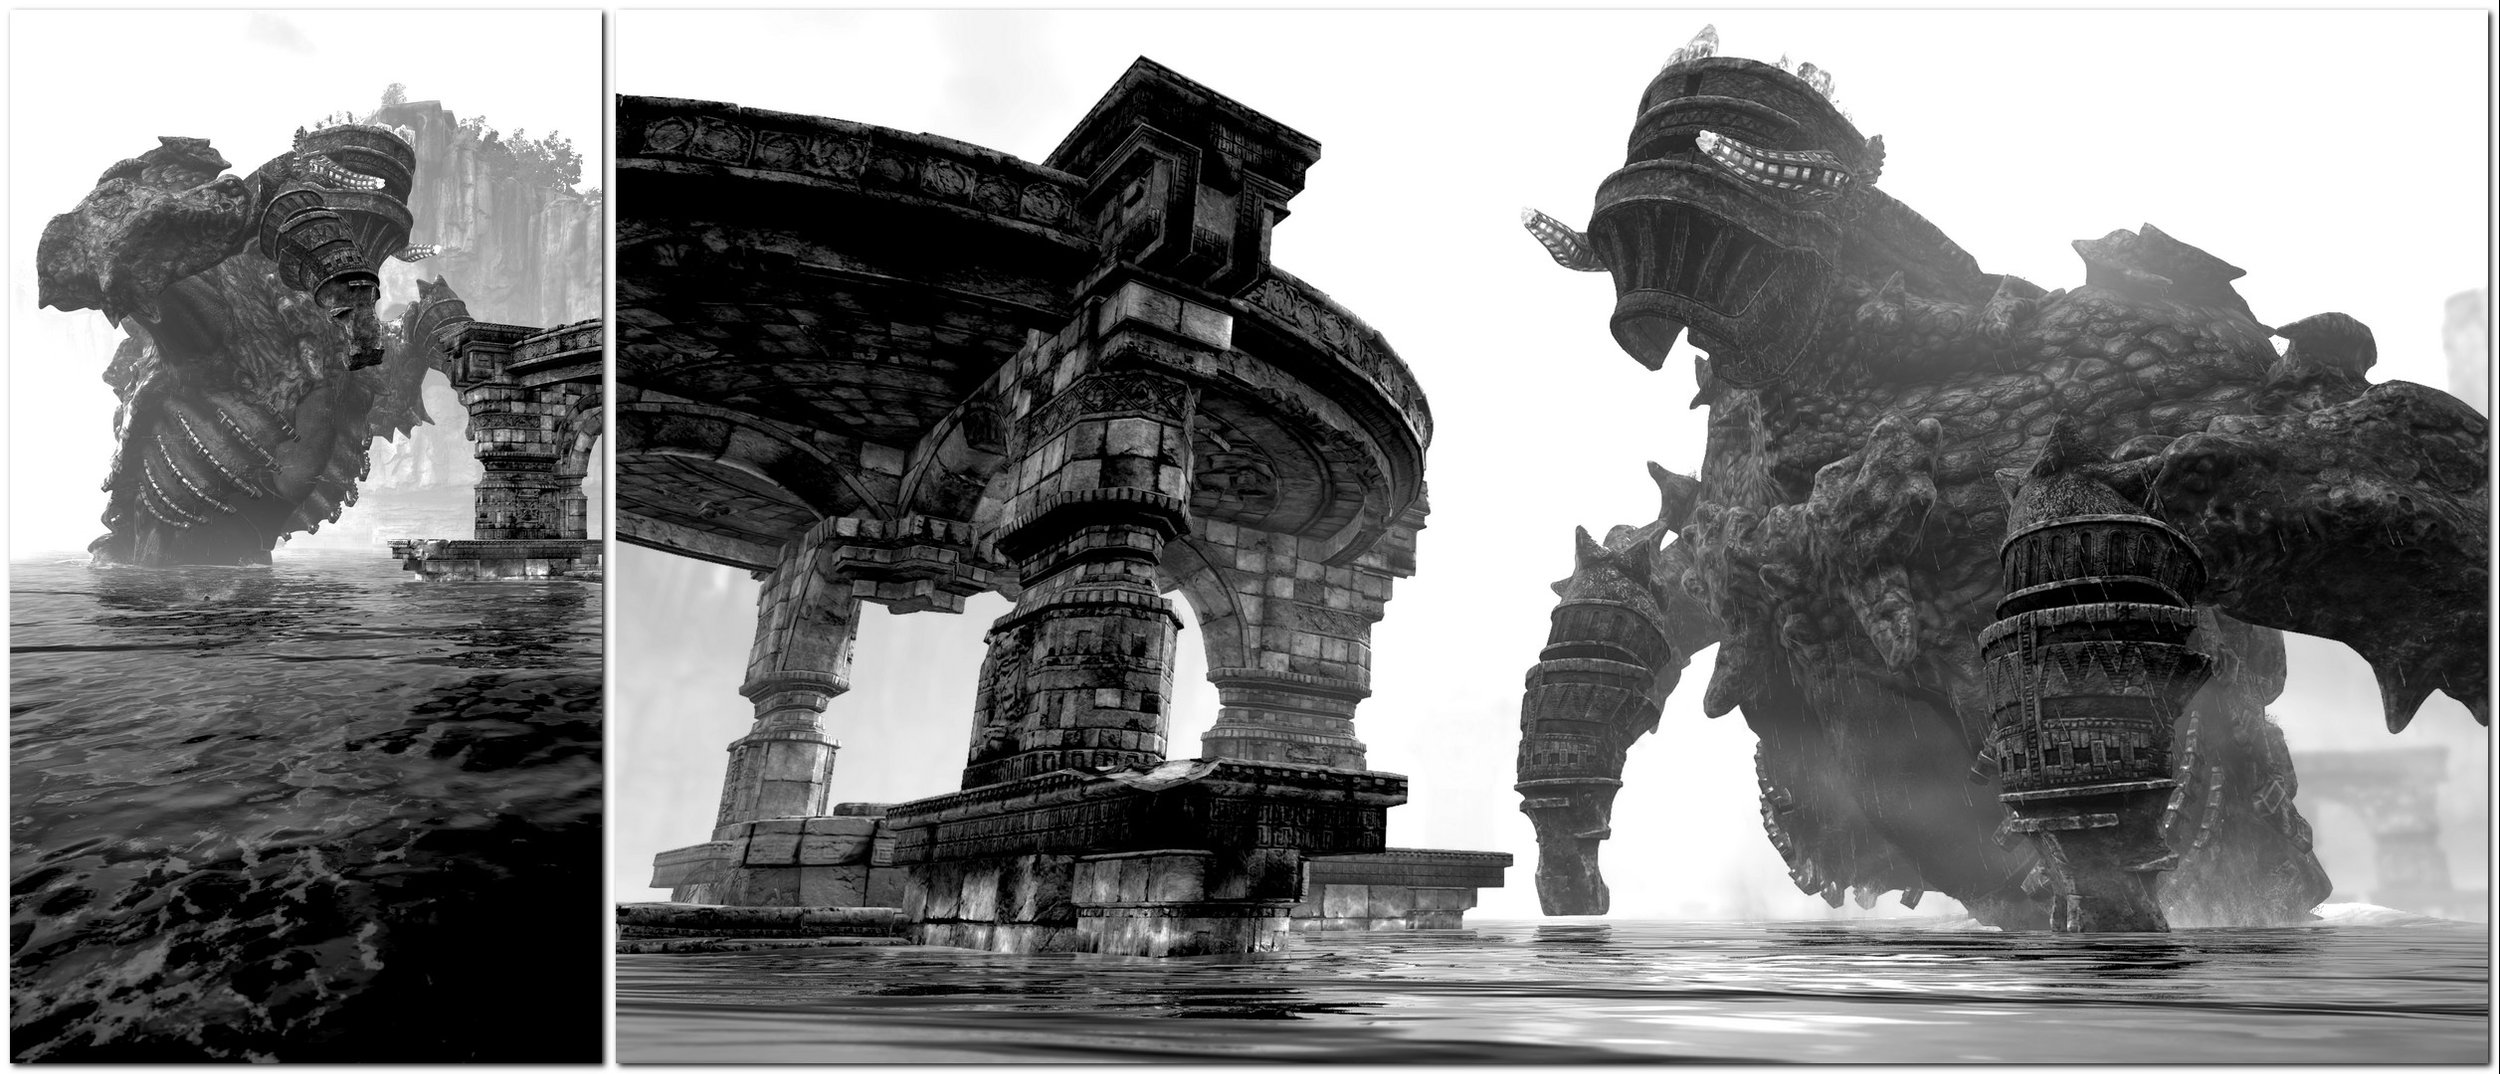
KUROMORI- THE WALL SHADOW
Kuromori, the 8th colossus, really did puzzle me. It's on of the easiest colossi to portray, but at the same time an ordinary capture of the rocky salamander from a ground level is so trivial and one-dimensional that I really can’t recommend that approach to anyone. In my opinion, one of the strenghts of the whole scenario is Kuromori's shrine. A 4-story "bucket" with a central spotlight that can really mess the lighting up if you are taking black&white screenshots, but at the same time can inspire some daring choices of composition. As far as I'm concerned, I choosed to include the shrine architecture in both my horizontal and vertical shots. For the widescreen capture I placed myself near one of the big cracks in the temple's walls, lured Kuromori to my floor and then really pushed the camera and the FOV to their limits until the camera "stuck" in a reasonable spot on the external walls. The "perfect" composition would be rather different but as far as this stiff photo mode allows I think this is one of the best possible camera placements. The vertical shot was equally difficult: Kuromori is constantly moving so it's very difficult to have it placed where you want when you want. For this reason, I decided to have the walls and the roof of the shrine as the central part of my composition, and then I tried to capture the deity while "passing by" with an over-exposed lighting and a strong contrast, pushing the final outcome to comic-book results. In the end, I really think I pushed the game and the photo mode to their very limits, and both captures can look quite original even if they are far from perfect. This is the photographic approach that I would totally suggest you to follow.

The photo on the left, inspired my gallery focused on the architectural beauty of Bluepoint’s remake
COLOSSUS #9
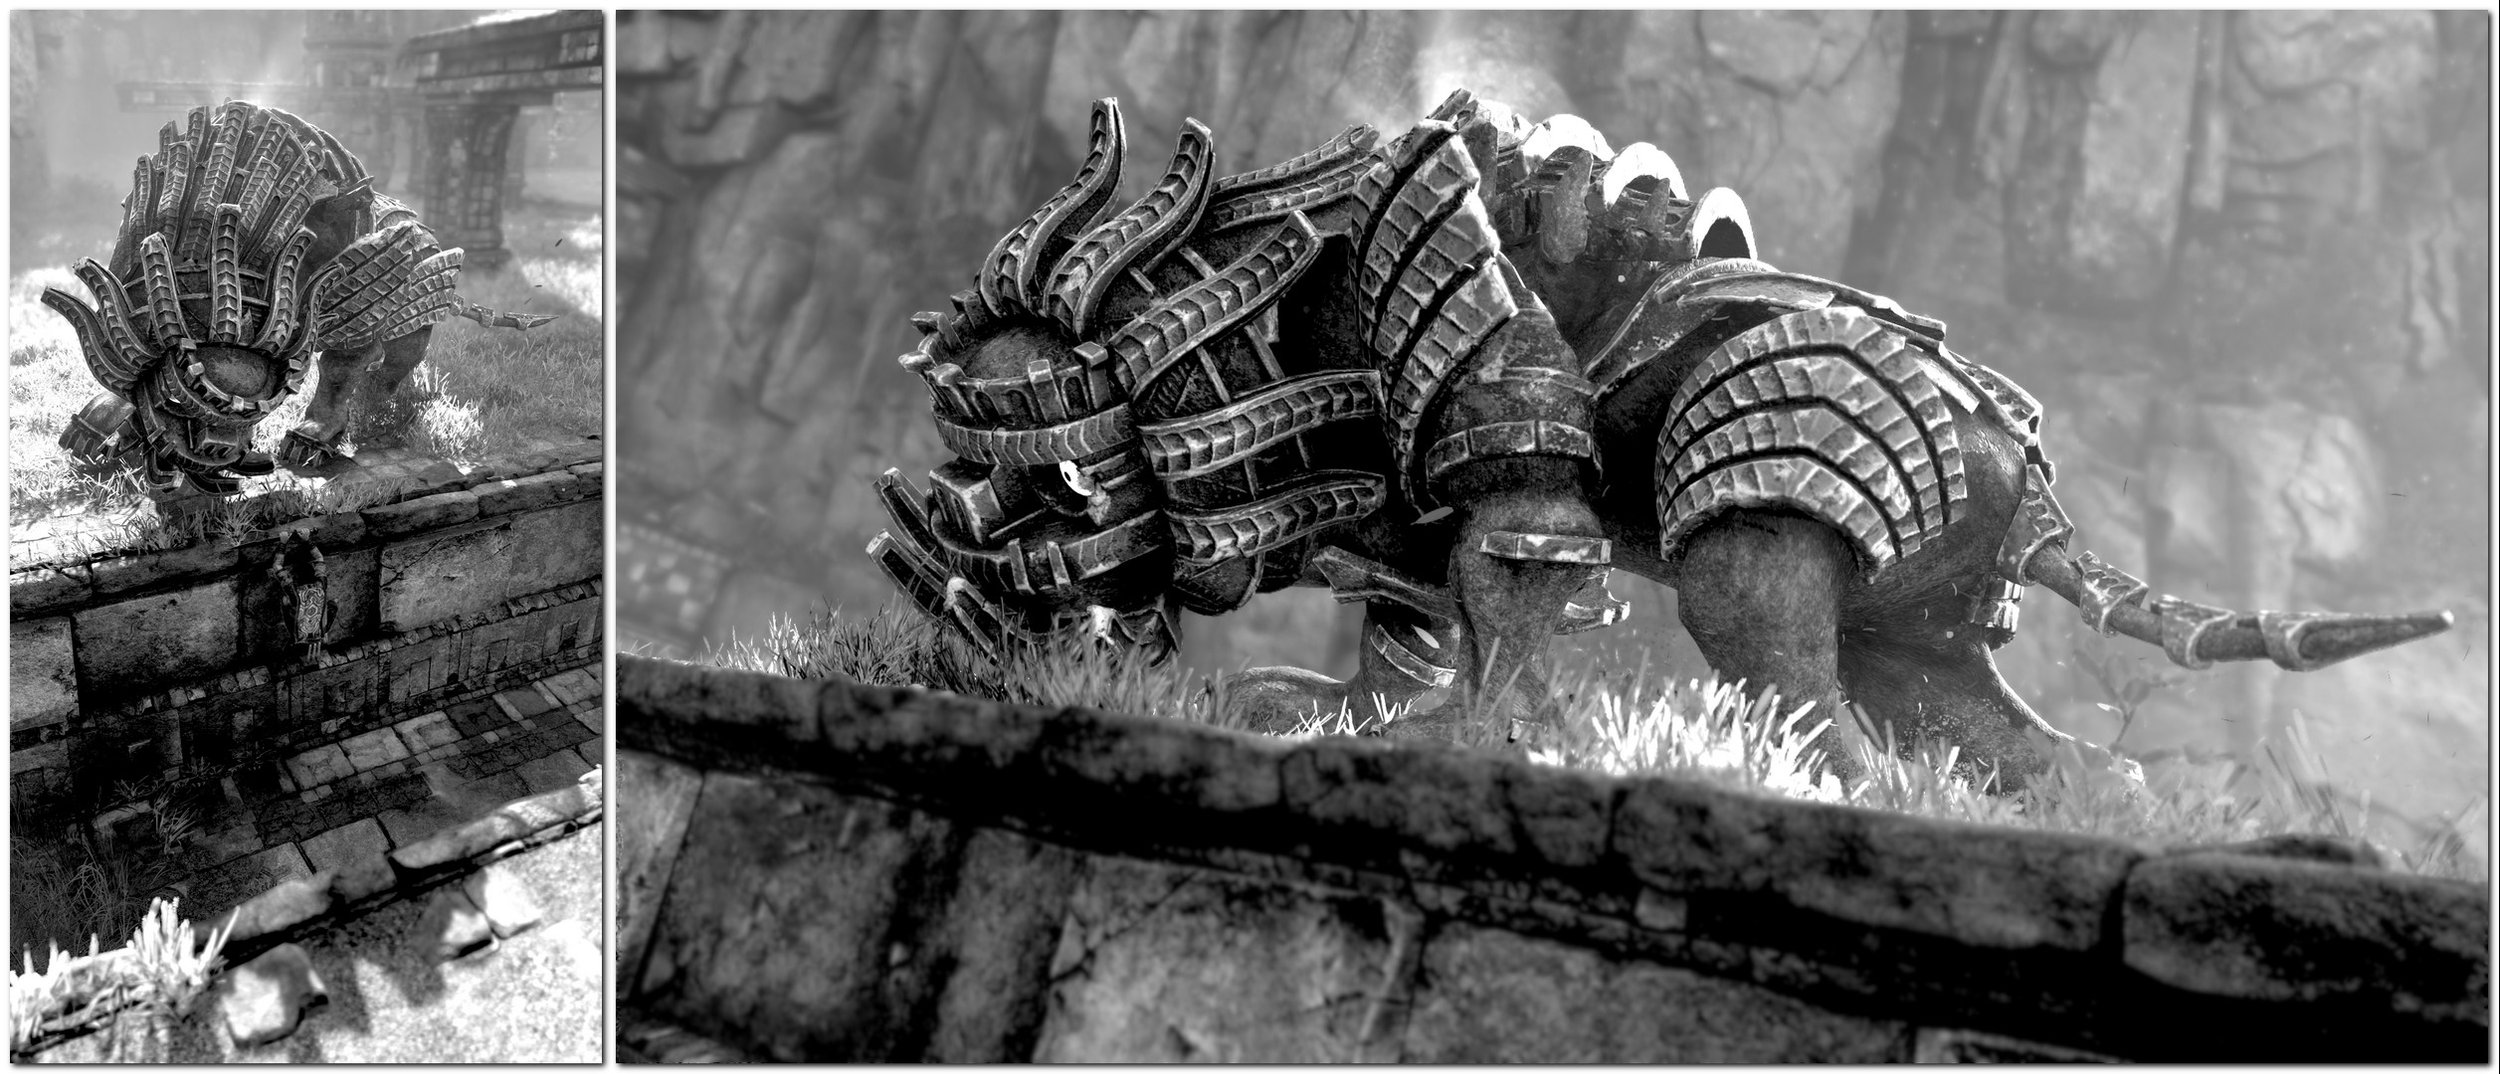
BASARAN - THE STORM ECHO
Basaran is a very "dual" colossus. It's extremely sexy and generous when modeling for horizontal captures, sporting a wide array of animations and patterns, as much as it is stone-cold (pun intended) and limited for vertical framing. For widescreen captures you really don't need any tip from yours truly, photography here it's really a piece of cake. For vertical framing I think the main concern for us virtual photographers is "filling" full&empty as much as dark&light spaces in a proper way while avoiding an excessive FOV in the process. For this reason, freezing the 9th colossus while standing still and trying to stomp you is the easiest way to fill your vertical screenshot (also) with action and pathos. Another useful tip might be that especially with this colossus, embedding Agro in the composition is very important for the sake of variety and overall elegance and balance. As a matter of fact, I decided to make Agro the star of my widescreen picture because -even if not my best capture technically speaking- it's a quite a unique and funny composition overall.
These are my best choices for vertical and horizontal photography. The widescreen one was probably better if cropped on the sides but I have to be honest, I love it.
4 Bonus shots: Basaran is so easy to capture in widescreen format I spent a few hours trying all the possible compositions and this is only a small part of them
COLOSSUS #10
DIRGE - THE SAND TIGER
Dirge is a giant sandworm, you can think of it as another Hydrus but without the chance to take screenshots from below the surface. For someone Dirge could be a nightmare, or a loss of time, but for me the 10th colossus is a new and exciting challenge every time I have to deal with it. While I was writing this guide I took 2 brand-new screenshots capturing the colossus in its almost-full body and that was truly unprecedented for me. I think the countless hours spent on this photo mode are finally paying me off. I have only one tip for this colossus but it's quite huge. At a certain point of your playthrough the camera will pass over your shoulder to frame the colossus' eyes while it is chasing you. It's part of the puzzle to kill it, it always happens. Following this pattern you will lose track of your position while approaching the cavern walls, Dirge will jump at you and while doing so it will crash on the cavern walls and pass out immediately after. If you launch the photo mode in those moments, you will probably have a hard time moving the camera because you will find yourself stuck between the colossus and the cavern walls. My trick for some decent captures is this one: as the camera tries to go behind your shoulders you can force it back in front of you, you can then regain full control of Agro's directions and head your faithful companion to the center of the cavern. Doing so, Dirge will jump off the sand towards you in an open (and photo-mode-friendly) environment, instead of near the camera-bouncing cavern walls. For the vertical screenshot, I really found no better option than the screenshot below.
Bonus shot: this is a rare and uncommon capture of Dirge’s full body from head to toe. As you can notice, even when at sand level the colossus never revals its body in full form
COLOSSUS #11
CELOSIA - THE FLAME GUARDIAN
It doesn't matter how many hours I put in Celosia, I'm never ever impressed with the results. This colossus is very similar to the 14th, Cenobia, both sharing the small size and the bland design. To make matters worst, unlike Cenobia's shrine Celosia's temple is neither complex nor evocative and the fight even ends on a flat sandy expanse! And I'm not even done here: Celosia it's also an easy colossus to portray so the casual photographer isn't even swayed to creative and lateral thinking to get clever or unique solutions in composition. Bottom line: when someone tells you that it's hard to be creative with bland and amorphous subjects, they are talking about Celosia. There are no tips or tricks for you here, just my two screenshots hoping they don't look too lame.
COLOSSUS #12
PELAGIA - THE GREAT BASILISK
While sharing with Hydrus a liquid environment, it's not possible to capture Pelagia's full body from below the water level because the lake is too dark to allow any kind of scuba photoreporting (the colossus' bovine shape doesn't help either). That said, at a specific moment Pelagia will emerge from the lake positioning itself upright on its legs to blast Wander with a plasma shot. That is the moment the majority of its body is revealed to the player and that's the moment I got both my vertical and widescreen capture (in 2 different endeavours). I have just one tip for you regarding this colossus: as soon as it emerges from the lake make sure that Wander leaps from the shrine into the lake and try to get him as far as possible before the colossus returns in its element (you have 5 seconds approximately). From the lake, from a certain distance, you will be able to capture its body with a FOV between 35 and 50 depending on the distance you were able to reach. That FOV level will not cause major aberrations and you will be able to capture the best this colossus has to offer in both ratios.
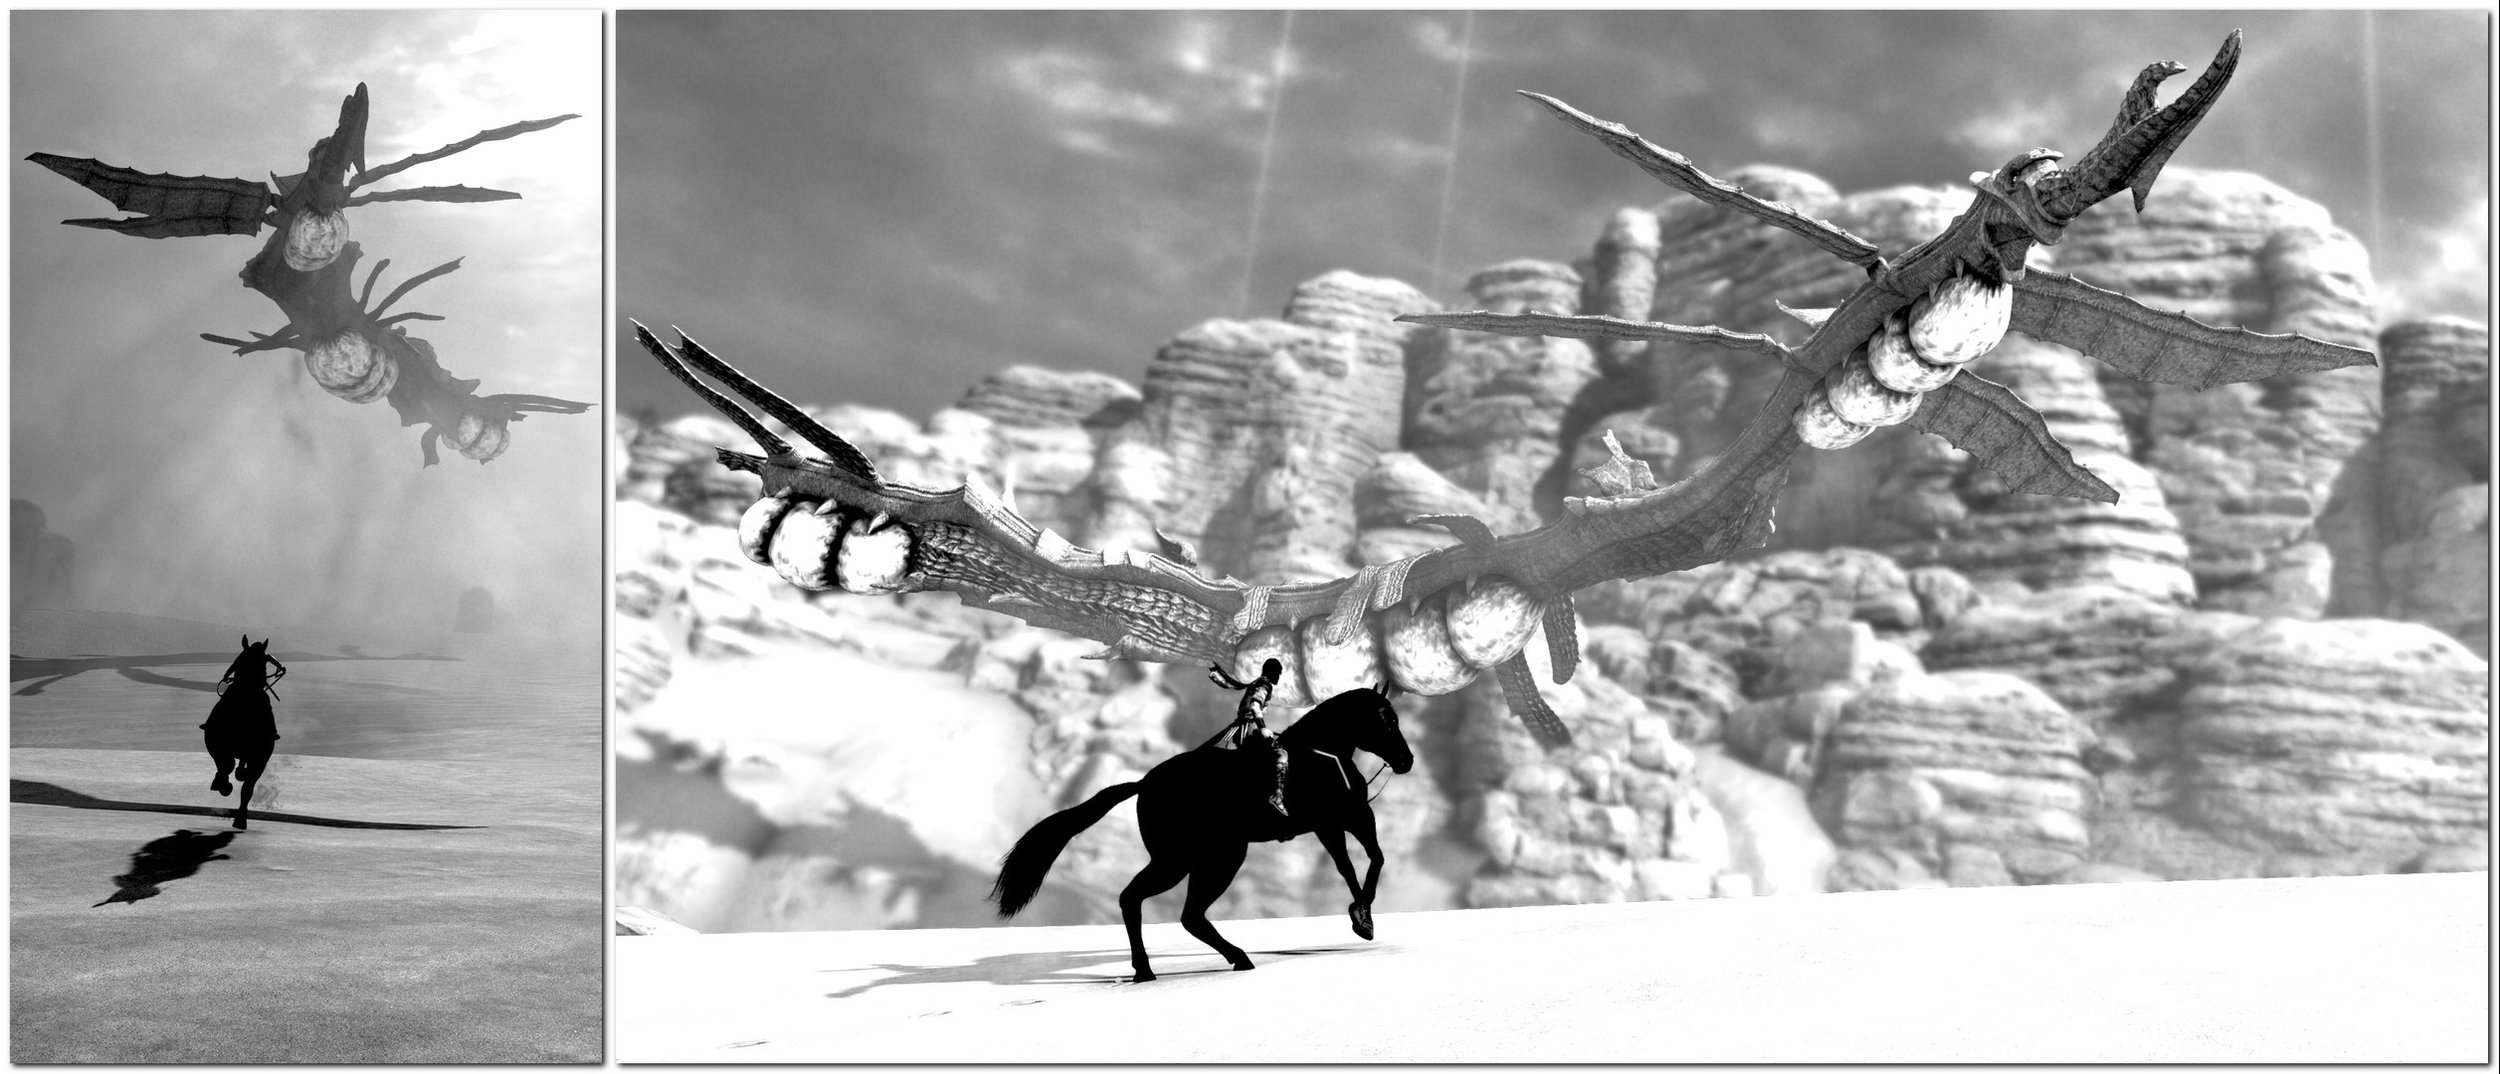
COLOSSUS #13
PHALANX - THE TAIL DRIFTER
At first, you might think that getting Phalanx's whole shape in a single shot it's an impossible task. That's because the most natural thing to do for the photographer is following the flying beast on its rather long path, keeping up with its pace while randomly launching the photo mode in the process. It's a very distracting and haphazard method because you don't actually see where Phalanx is going, you just know that the titan is somewhere above your head, you hope to get a nice casual shot from the right distance with the right FOV, and it just never happens. But as with Dirge, what seems natural is not actually the best thing to do. My tip for this colossus is very simple: try to understand where its most frequent checkpoints on the map are, and then patiently wait for it to fly over those checkpoints. Doing so, you will have all the time to get Agro in a sexy pose while Phalanx is approaching from afar capturing also the whole shape of the colossus from various distances.
COLOSSUS #14
CENOBIA - THE DESTRUCTION LUSTER
The two small colossi, Celosia and Cenobia, don't have interesting attack patterns neither interesting elements in the armour or design and, as as a result, they are terribly mundane and uninspiring for the VP. If you add the fact that Wander animations when attacked (or hit) are rather disjointed and exxagerated, you get the idea of how difficult can be portraying the two mini-titans in a creative and interesting way. But unlike Celosia's, at least Cenobia's shrine offers some interesting backgound to work with for a less semplistic composition overall. My tip for this colossus is to use the trenches in the ground to your benefit. You can capture Cenobia while jumping over them, or you can try to hide Wander behind them triggering some kind of reaction in the colossus. In the strip below you can see my approach to photography for this specific colossus: in the vertical shot I worked with spaces, lines and light to bild an interesting composition in an otherwise trivial moment. In the widescreen shot I worked very hard on framing to get the colossus from an interesting angle and height avoiding a full-frontal capture (that I tried so many times to get, without any kind of satisfying results).
Capturing Cenobia was a really stressfull process. I didn’t like any of the many of captures I got with my previous runs. Even these two, while competent and original in cut, do no completely satisfy me.
Bonus shot: this should be a fair and square capture of Cenobia, but I can’t feel it! It’s cold and bland and mundane, that’s why I tried to add some tilt to my captures above.
COLOSSUS #15
ARGUS - THE SENTINEL
Argus is a beauty to behold. Like Valus and Barba, its massive size and fierce look are simply enough for all of your needs. With the 15th colossus you don't have to spawn specific battling scenarios to get a decent shot. The titan itself, is a decent shot. Yes, you’re right, this gorilla-like deity sports indeed a massive attack with a rocky machete that looks like the perfect subject for an action shot but you know what? The colossus' lenghty arm stretching struggles with the rubberband-effect of the photo mode and it's impossible to capture this specific attack with a correct FOV value. That's why I suggest you to portray Argus in the most simple and effective way: full-frontal, from Wander's POV. Here below, you can find also my personal tip for a vertical shot from an unusual and original spot
COLOSSUS #16
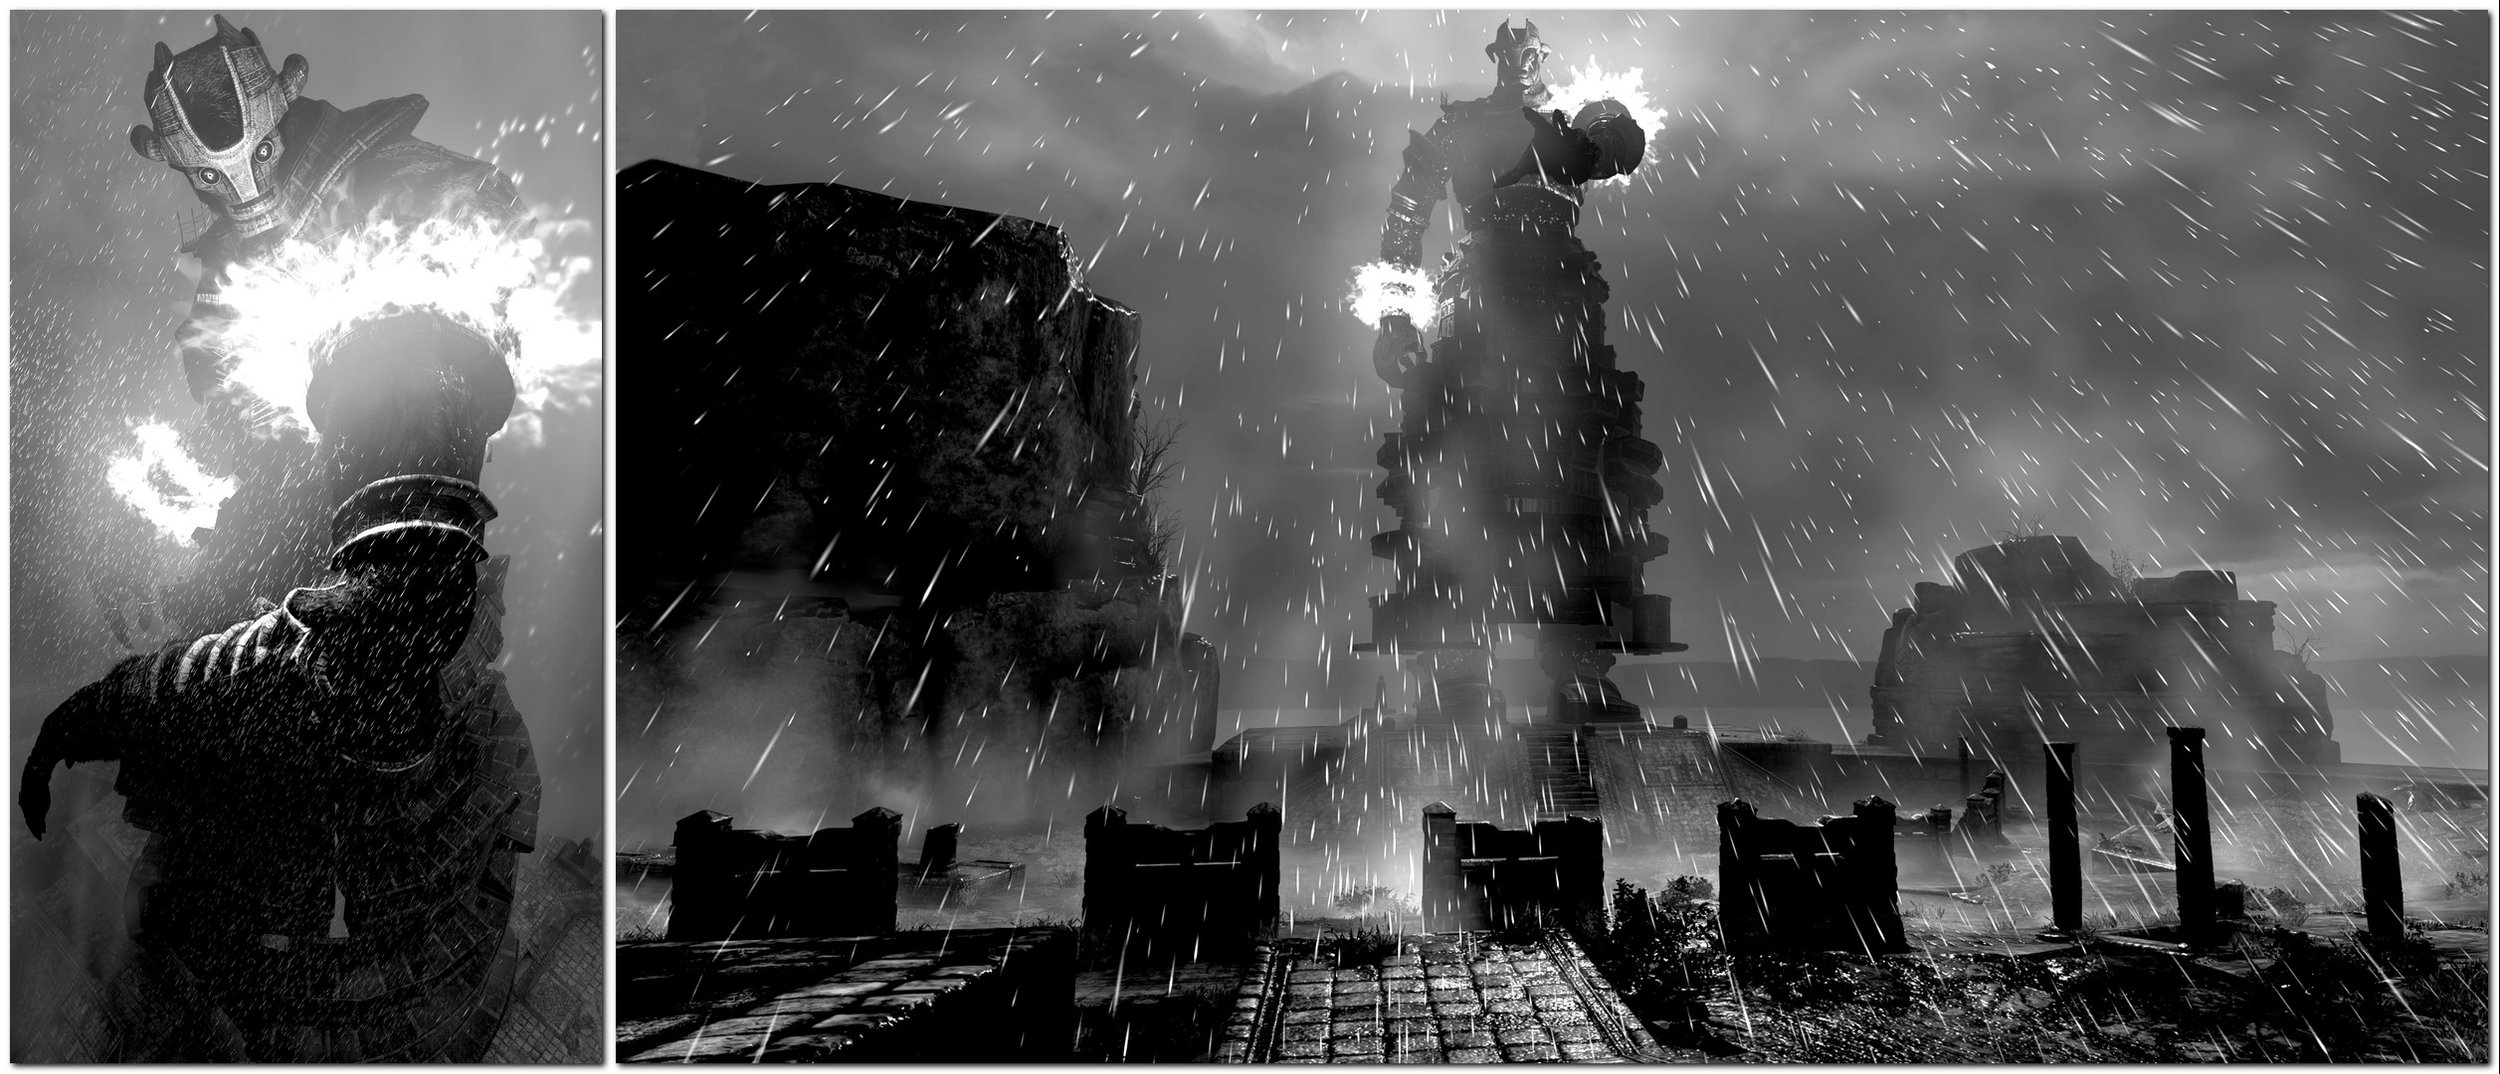
MALUS - THE GRAND GIGAS
Malus, faithful to its name, brings an unwelcome gift to the virtual photographer: heat-seeking, high-impact plasma shots. In other words: you can't take a regular widescreen photo out in the open because you are going to be hit and dead in the blink of an eye. Once you start climbing the 16th titan it's a whole new story, and indeed it's a lot easier to get a vertical screenshot than a widescreen one, but this guide was made to help you with the hard stuff, not with the easy one, so here's my tip for this last and menacing colossus. As soon as you reach the plateau where Argus lies don't go to the right side where the underground trenches are placed, but look at your left side instead. You'll see some kind of old collapsed wall that apparently isn't able to grant any kind of shelter but, to everyone's surprise, actually protects from Argus' rage even with Wander standing upright on its legs. From that position you can try to take a decent widescreen screenshot of the whole plateau as you can see in my capture here below.
Dear friends, this is the end of my journey into this wonderful game. I hope you appreciated my effort and that this guide was a helpful reading. If you need any of these screenshot in its 4K original size, please PM me at any time and I will send them to you by mail. If you like what I did for the whole community spread the word and the link to this article, it will help me keeping up with my projects.
Thanks!